

Add Custom Text and Translations
Overview
The Aeries Online Enrollment Admin Login provides various options that can be customized, allowing Districts to tailor the presentation of Enrollment information to be completed by Parents.
To configure the Aeries Enrollment System Settings login to the Admin page.

The System Settings area has five configuration tabs; Basic Settings, Custom Text, Questions & Codes, Admin Users, School Settings and Document Upload. Translations are supported on the Custom Text and Questions & Codes area.
NOTE: The settings in the screenshots below are examples.

Basic Settings ↑
On the Basic Settings tab the Enrollment process is configured, such as which pages and languages are shown to the Parent, along with connection and email settings. After any changes are made, click on the Save All Basic Settings button at the bottom of the page.


- Current Enrollment Year– The CURRENT school year.
- Pre-Enrollment – Enable or Disable Pre-Enrollment. If enabled it allows parents to be able to pre-enroll for the next school year.
- Enrollment Age limits- A minimum and maximum age can be defined for enrollments. Age is calculated as of 09/1 of the current academic year, using the Birthdate the Parent enters. If the age is outside of the set range, an alert displays and the enrollment stops. The user will see a message "Please enter a valid age in order to continue." See Aeries Online Enrollment Parent Process for screenshots of the messages.
- Enforce TK Birth Dates- In addition to the set Enrollment Age Limits, when enabled, users will be prevented from enrolling students in Transitional Kindergarten if their birth date does not fall within CDE's eligibility guidelines. The user will see a message "Please enter a valid age in order to continue." If this option is not enabled, the user will be able to change the grade level from Transitional Kinder to Kindergarten for example, and continue through the enrollment process. See Aeries Online Enrollment Parent Process for screenshots of the messages.
- Transitional Kindergarten eligibility dates:
- In 2022–23, children are eligible for TK if they turn 5 years old between September 2 and February 2*,
- In 2023–24, children are eligible for TK if they turn 5 between September 2 and April 2*,
- In 2024–25, children are eligible for TK if they turn 5 between September 2 and June 2*,
- In 2025–26 and beyond, children who will have their fourth birthday by September 1* of the school year are eligible to receive ADA and be enrolled in TK grade level. Students who turn 5 on or by 09/01 can enroll in Gr KN.
- Transitional Kindergarten eligibility dates:
*Inclusive of these dates
- District Name – The name of the School District. This text is shown on the Login page. Ex: Eagle Unified School District.
- Street Validation –Options are None, Street Table, or DecisionInsite.
- None - No address validation is used. Parents can enter any address.
- If set to Street Table the Street table (STR) is used for School assignments based on the Student Resident Address (STU.RAD). It requires a populated and maintained Street table in Aeries.
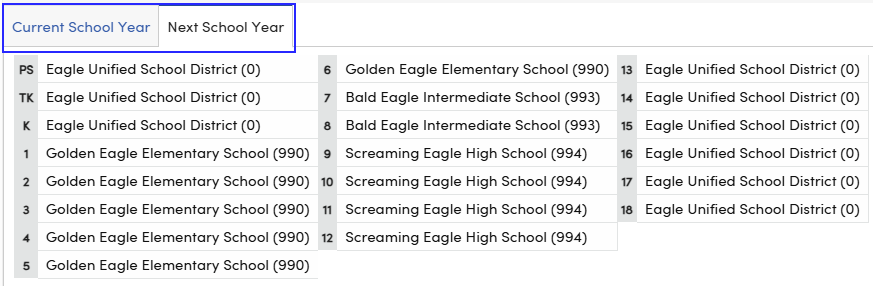
- If a student is enrolling for the current school year, the Current School Year Street fields are used to determine the school assignment.
- If a student is enrolling for the next school year (pre-enrollment), the Next Year Street fields are used to determine the school assignment.
- If set to use DecisionInsite, they validate the street address and show School assignment.
- Note: The option to use DecisionInsite only appears in the list to select if the option to “Use DecisionInsite for Street Validation” has been enabled in the Aeries Web. Review the documentation here.

- Ask for Preferred School? – If set to Yes allows the Parent to select a Preferred School that exists within the LOC table.
- Ask for Student email? - If set to Yes the Student email is required.
- Ask for US Enter Date? - If set to Yes displays the question "What is the Student US Entry Date?". If set to No this question is hidden and the first question displayed is "What is the student's US School entry date?".
- Ask for US Pre-School Enter Date? - Yes/No
- Ask for Special Ed? - Whether to ask if a Student was previously Special Education at their last school. The answer populates the Special Ed? field on the Enrollment History >Other District Enrollments page.
- Ask for US School Enter Date? - Yes/No
- Ask for CA School Enter Date? - Yes/No. Setting this to No also hides the question "Has your student previously attended a school in this district?".
- Ask for birth place? - Yes/No. When set to No the Birth city, State, and Birth Country fields are hidden.
- Show Signature line on Confirmation page? - Yes/No
- Enable E-Signature? - Yes/No When set to Yes the Registration Confirmation step will display a message and text box allowing the parent to type in their name which will serve as an electronic signature for the student registration.
- Ask for 504? Whether to ask if a Student was previously on a 504 plan at their last School. on the Other District Enrollments page. The answer populates the 504 Plan? field on the Enrollment History >Other District Enrollments page.
- Skip Home Language Survey for Student’s who have previously attended a California School - If set to Yes, the parent will be asked "Has this student previously attended a California school?" at the top of the Language page. If set to No, the language survey will be asked normally. Note: This setting is only relevant if this page is not set to be Skipped in the Optional Pages section.

Optional Pages – Options are available to Show, Skip, Show (Optional) or Show (Required) for certain pages in Aeries Online Enrollment during the enrollment process.
- Show – Display the page to the parent during the enrollment process.
- Skip – Hide the page during the enrollment process.
- Show (Optional) - Display the page during the enrollment process but not require the page be completed.
- Show (Required) - Display the page during the enrollment process and require the page be completed. In the case of Immunizations, required means an acknowledgement that the student has no immunizations.
NOTE: If no selection of Show or Skip is made, the page defaults to Show.

Language Choices – Select which languages to make available to Parents. English is the default language and remains selected. The Language Choices selected display on the login page.
The majority of translations pull from the COD table in Aeries Web. Before enabling a language, ensure all of the Codes and Questions are translated. The Family Military Survey and the Residence Survey use the translations from Portal Options according to the School the Parent is enrolling for.

The selected Language Choices also display in the top right menu on the Enrollment pages. These language links can be used to switch from one language to another after a new Student enrollment has been added to the system. These links can be helpful to a person who may have started an enrollment using a language they are not as familiar with and allow them to switch to a language they are more familiar with to complete the enrollment process.

Grade Choices – Select which grade levels the Parents can choose from. The Grade Level descriptions pull from the Define Student Grade Levels form in Aeries.

The lower portion of the Basic Settings tab consists of configuration settings which must be populated correctly in order for the synchronization between Aeries Online Enrollment and Aeries Web to function.

From Name – The Name used when Aeries Online Enrollment sends emails to confirm new accounts. Ex: EUSD Online Enrollment.
From Address – The From email address that is used for Aeries Online Enrollment emails. Ex: enrollment@example.com
Email Server Host Name – The SMTP server that Aeries Online Enrollment uses to send emails.
Email Server Host Port – The TCP port Aeries Online Enrollment uses when sending emails. It is usually 25.
Enable SSL – When this option is selected, all outgoing mail is encrypted with SSL. This option works on an email server set up to receive SSL and TLS encrypted emails such as Gmail.
Email Server User – This is optional. Username used to authenticate to the SMTP server.
Email Server Password – This is optional. Password used to authenticate to the SMTP server.
Test Sending Email – After entering all email server settings and clicking on the Save button at bottom of page, a test email can then be sent.
Support Email Address – Currently this field is not used, however it can be populated with the email address a Parent would contact for help with the enrollment process should it be used in the future.
Code – The common code used by Aeries Online Enrollment and Aeries that enables the Sync web service to function. Click on the Generate Random Code button to generate the code. This same code then needs to be populated on the District School Options page. This is CASE-Sensitive!
Base URL – The base URL of the Aeries Online Enrollment website. HTTPS is required. This URL is also used as a link in emails . This URL also needs to be populated on the District School Options page.
Google Maps - If set to Yes it enables the use of Google Maps in the enrollment process. This displays a Google map of the School after the School is selected or assigned. A Google API key is not required.

Database Connections - This area shows the Online Enrollment Database name and the Aeries Database name being used for the Enrollment process.

After any changes are made, click Save All Basic Settings button at the bottom of the page.
Settings in Aeries Web ↑
Once you have populated the Code and Base URL on the Basics Settings tab, you need to sync Aeries Online Enrollment with the Aeries Web database.
On the District level School Options page, the District Options area displays two Online Enrollment Settings fields: Synchronization Key and Base AIR URL.

The Synchronization Key Code and the Base URL fields need to be populated with the same Sync Code and Base URL that was populated in the Basic Settings tab.
Custom Text ↑
The Custom Text tab allows a District to define what text is displayed to the Parent when using enrolling a Student. The Custom Text supports translations for each language selected on the Basic Settings tab. This text usually consists of instructions to Parents and explanations of different options available

With these editing capabilities, text can be highlighted with a color or bold font.

The applied formatting displays to the Parent when enrolling a Student.


Add Custom Text and Translations↑
Select a language from the dropdown list to view, edit or add custom text.


To add text for a language, select the language from the language dropdown at the top of the page and enter the translated text.


Documents ↑
Navigate to School Info > Portal Management > Portal Documents.
Security ↑
| Table | Permission | Description |
| Portal Options | Read, Insert, Update | View, Add and Edit documents |

To add a document to the Documents area, click Add Document. A File Upload area displays to select the file you wish to upload. After your file has been uploaded, the File Name be populated with the name of your document. Type a title in the Title field. To display the document for Online Enrollment, check the Online Enrollment option for the document.

These options allow different documents to be displayed for Students enrolling in the current year versus next year.
- Current and Pre-Enrolled. This shows the document to all Students.
- Current Year Only - displays to all current Students
- Pre-Enrolled only displays to pre-enrolled Students.
Required - Require Parents to view the Document.
Confirmation Text - Used to display text to the Parents alongside the confirmation checkbox. Examples of text include "I have read the required document" or "The Student and Parent agree to this document". This text is entered in the Update Code Table page (DCV.CT) Description field, along with Translations.
Save - Saves this document but leaves the form open to add another one.
Save and Close - Saves this document and closes the form.
Clear Changes - Reverts back to previous settings.
Visibility button (eye icon) - Displays the document to specific Grade Levels and Schools. For example, a document can be displayed only to 7th grade students at the Middle Schools. Select the Grades and Schools desired on the two tabs.


After saving, the page now displays what Schools and Grades the document is associated with.
NOTE: For Districts that allow enrollment in Programs, a new grade level 99 has to be added to the COD table so it appears in the Grades tab and can be selected so the Documents show up during enrollment. This SQL inserts the grade level. The DE Description 'Online Enrollment Program' can be changed to the name of your Program.
INSERT COD (SC,TC,FC,CD,DE,AC)

SELECT 0,'STU','GR',99,'Online Enrollment Program',99


Documents may be re-ordered by utilizing the Drag and Drop icon.


Online Documents ↑
NOTE: the .config extension needs to be added to the Allowed Files list on District Settings


Questions and Codes ↑
The Authorization Codes in Aeries Online Enrollment map to the Authorization Status field in Aeries (AUT.ST).
Yes Option Aeries Code – This is usually set to 1
No Option Aeries Code – This is usually set to 2

NOTE: Authorization Codes and Questions must be entered under the English language option on the Questions & Codes tab. The Authorization Questions entered under English apply to all languages but can only be added and modified under English.
The Authorization Question codes map to the Authorization Code field (AUT.CD) in Aeries. The values entered in the Code fields and the text entered in the Question field in must match what is in the Aeries code table for AUT.CD.
To add a new Authorization code, type an authorization code and description and then click on Add.
To delete an Authorization Question, click the mouse on the Delete button to the right of the question.

NOTE: If an enabled code is deleted from the COD table in Aeries, it is not automatically delete from the Aeries Online Enrollment Admin Questions and Codes area. The code has to be removed by clicking on the delete button next to the appropriate code.
Translations can be added for the Authorization Questions by choosing another language from the drop down:

If the responses are in a Dropdown, you can add translations by clicking on Edit Choices.


If a minimum and maximum age limit have been set in the Basic Settings area a custom message can be added to display during the enrollment process if an invalid age has been entered.

The Contacts area has three settings and allows for the customization and translation of the “Allow Portal Access” question along with additional contact options to be set.

Ask Allow Portal Access – If set to Yes, ask “Allow Portal Access” on the Parent Information and the Emergency Contacts page. It requires an email address be entered for the Parent/Guardian and the Emergency Contact that are set to Yes. If set to No, the field will be hidden on both the Parent Information and the Emergency Contacts pages.
Ask Should a second copy of mail be sent to this contact – If set to Yes, ask for Mail Tag information on a Contact. This field maps to CON.MT in Aeries.
Ask Education Level – If set to Yes, the question will be displayed asking for the highest parent/guardian education level for each Parent/Guardian entered on the Parent Information page. This question will be required if set to Yes. If set to No, the field will be hidden. The highest Parent Ed level can be required by parent/guardian contacts by enabling the District Settings feature. See District Settings for details.
Ask For Email – If set to Yes, the system will prompt for the email address of Emergency Contacts during enrollment.
If set to No, the system will not prompt for email addresses, and it will also disable the “Allow Portal Access” question for Emergency Contacts, even if the Ask "Allow Portal Access" setting is set to Yes.
Portal Access Customization ↑
To customize the Header field text for the Allow Access To Portal question, type in the desired text in the Header text field and then click on the Save All Questions & Codes button at the bottom of the page.

NOTE: If this field is left blank, the default system text of “Allow Access To Portal” displays to Parents.
The Help text which displays when the Parent hovers over the Question mark icon next to this question can also be customized by adding the desired text in the Help text box.

Contact Codes ↑
The Contact Codes and Relationship Codes are configured under the English language option, but translations apply when the Parent is logged in.
The Contact Code values map to the CON.CD field in Aeries. The codes that are entered must match what is in the Aeries Code Table for CON.CD.
These codes have rulesets that can be enabled in the District Settings page that will require a parent account to populate a few important fields required for CALPADS; Parent Guardian Last Name, First Name and Highest Ed Level.

During the Import Student process, these codes will populate into the Record Type field for each contact record that exists for the student.

The Contact Relationship Codes area has a dropdown where you can select which codes are available to be used in Aeries Online Enrollment. The values from the drop down list come from the Aeries Code Table for CON.RL.
In order to make a code available for Aeries Online Enrollment users, select from the list and click Add. Use Delete to remove a Code.

NOTE: If an enabled Contact Relationship code is marked as Inactive or is deleted from the Code table (COD) in Aeries, it no longer displays to the Parent, but continues to appear in the Settings.
General Student Information ↑
The General Student Information area has four settings.

Ask Student’s State ID – Enable/Disables asking for the Student’s State ID.
Require Ethnicity – Enable/Disables requiring a value be entered for the Ethnicity of the Student. The question still displays to the Parent.
Require Race – Enable/Disables requiring selecting the Race of the student. The question still displays to the Parent.
Supplemental Questions ↑
Supplemental Questions can be added for Parents to answer as a way to capture answers normally given in paper form in addition to the traditional enrollment paperwork. Each question is mapped to a destination table and field in Aeries Web. The current destination tables available to store answers are STU and SUP.
The codes that are set up in the Admin Online Enrollment must match the code value and length that is in the Aeries Code table (COD) for the corresponding STU or SUP field.
For example, field STU.U11 in the Aeries Web is used to store a dropdown of choices with codes A, B, and R. The Online Enrollment side must also set up with the same codes values of A, B, and R to match.

NOTE: The Code field found in the 'Edit choices' popup in Online Enrollment does not limit the amount of characters entered and will not validate against the character limit set for the STU or SUP fields in the COD table of Aeries Web. Failure to match the codes in both areas will cause student records from Online Enrollment to fail during the Student Import process.
To assist with verifying the field length of each field, use the Database Table Information report in Aeries Web to determine the character length that is acceptable as a code value for the STU or SUP table fields.

Using the Length/Digits column, you will be able to determine the appropriate code value length that can be added to the fields to store codes for the parent responses.

To enable the system ask Supplemental Questions, set the Ask Supplemental Questions field to Yes.
Filter by Questions can be used to view active (enabled) or inactive (disabled) questions. Questions that have responses will not have a 'Delete' link and can only be disabled.

To add a Supplemental Question, click on the Table drop down and select either STU or SUP.
- Field- The field you would like the response to populate.
- Question - Type in the Supplemental Question you would like to ask.
- Type -YesNo or Dropdown.
- YesNo option requires a Yes or No response to the question.
- Dropdown - Multiple choice response to be selected. After choosing Dropdown from the Type field, click on the Add button. An Edit Choices link now displays.

Click on Edit Choices button to add in answers for the Parent to select. The Codes and descriptions that are entered must match what is in the Aeries Web Code Table (COD) for the specified table and field.
Type in the Code and description and then click on the Add button.

Once your Supplemental Questions are entered, you can use the options to the right of the question to do the following:
- Up/Down – Change the order of the questions asked.
- Edit – Edit the question. Question Type cannot be edited. Delete and re add the question.
- Disable – Disable the question. This option is useful to “retire” a question that is no longer in use but that have existing enrollments that reference the question.
- Delete – Deletes the question. Questions cannot be deleted if they are referenced in an enrollment.
After you make your selection click on the Save All Questions and Codes button.
NOTE: If an enabled code in Online Enrollment is deleted from the COD table in Aeries Web, it is not automatically deleted from the Questions and Codes area in the Admin side of Online Enrollment. The code can be removed by clicking on the Delete link next to the appropriate code or simply disable the code by clicking the 'Disable' link.
Admin Users ↑
The Admin Users area is where you can create additional Administrator logins for the Online Enrollment configuration.

To add a new Admin user, type the username in the box and then click Add button.

NOTE: All new administrator logins default to this password. The first time the new Admin account logs into the Admin module using the password shown in this setting, they must set a new password.
After a user name has been created, it shows under the Admin Users tab. There is an Edit and Delete option next to it.
School Settings ↑
The School Settings tab is used to designate which Schools are available for Parents to select for enrollment. The available schools in the Select School to Add drop down list come from the LOC table.
Online Enrollment allows for enrollment into Schools and Programs.
A School is a typical school in Aeries with a fixed grade range.
A Program is non-grade specific. If Programs are enabled they appear as available options in the early stage of enrollment.
When enrolling, users have the option of enrolling a Student for either a Grade or a program. Programs are optional and are not required to be configured for Aeries Online Enrollment.

To add a School, under the School Settings > Schools enabled For enrollment area, click on the Select School to Add drop down list and select a school.

Once a school is selected you can provide an Email address that Online Enrollment uses to send an email notification when a Parent completes an enrollment. The email notification is dependent on the email settings being configured correctly on the Basic Settings tab. Multiple comma-separated emails may be entered, but no space between addresses.

Once a School has been enabled, it can be removed using the Delete button. If deleted, the only way to enable the school again is to re-add it.
To add a Program, follow the same steps above for adding a School. If a Program is defined, it shows as a School name choice for the Parent instead of a Grade level. In addition, it also bypasses any Street validation and allows the Parent to enter any address. Additionally, the Grade level is defined as Grade 99.

NOTE: For Districts that allow enrollment in Programs, a new grade level 99 has to be added to the COD table in Aeries Web so that grade 99 appears in the Grades tab and can be selected so that the Documents show up during the enrollment process. The SQL statement below inserts the grade level for you. The Description (DE) of 'Online Enrollment Program' can be changed to the name of your Program.
See Documents step above for steps to ensure enrollment Documents are visible to these enrollments. ↑
INSERT COD (SC,TC,FC,CD,DE,AC)

SELECT 0,'STU','GR',99,'Online Enrollment Program',99
Document Upload ↑
The Document Upload tab is to configure the Categories of documents you want the Parent to provide during the enrollment process.

The Allowed File Types is used to prevent Parents from uploading unwanted file types. Only files IN this list can be uploaded. You may add more file types using the .xxx format separated by commas. Max file size is 4mb, otherwise the file upload fails for the Parent.
NOTE: If the file uploaded is a HEIC or HEIF file (default iPhone picture format) it is automatically converted to .jpg format

The File Requests section is where you define the Files you would like Parents to provide.

- Category/Subcategory are defined in Update Code Table > DOC.CT and DOC.SCT. These categories have no effect on the page display to the Parent and do not organize the Documents in any way. They are fields that are imported into the Category and Subcategory fields in Student Documents. See the Student Documents for more information
- Required prevents the Parent from continuing unless a document is provided. Parents may upload multiple Documents per Request.
- Security Area defines the table to which Users need at least Read permissions to be able to view those Documents in Student Documents. See the Student Documents for more information
- Title is what displays to Parents as the type of document requested.
- Description can be used to give instructions to Parents, such as "For Proof of Residency you may upload a Utility Bill, Cable Service Bill, Lease or other Document that verifies your Residence Address".
- Up and Down links allow you to change the order in which File Requests are displayed to the Parents
- Edit allows changes to the Document Request


Translations can be added by using the Language dropdown at the upper right

Click on the Edit link to add a translation and Save.

Add District Logo ↑
Aeries Online Enrollment allows for a District Logo to be added that displays on the right-hand side of the enrollment pages.
A virtual directory needs to be created to store the District Logo. This folder should reside outside of the main Online Enrollment folder that contains the website. This setup makes upgrading to new versions of Online Enrollment easier as any custom images reside outside of the application folder.
The first step is to create an App Settings folder. The default location is c:\AppSettings. Once the folder is created, you can copy the logo into this folder.
The District Logo should be 80 x 80 pixels and should be in PNG format. It should be named DistrictLogo.PNG. The logo should contain an alpha transparency background for optimal display. If it does not support a transparent background, double check to see how it displays in Online Enrollment prior to use. Some color adjustments may be necessary for optimal display.
Once the District Logo is copied into this folder, open Internet Information Services and right click the folder where Online Enrollment is installed and select Add Virtual Directory. Enter AppSettings as the alias. In the physical path folder, select the folder you created (c:\AppSettings) and click OK.