Adding a New Transcript Definition
Allow Parents/Students to Print a Transcript
Overview
The Transcript Definition page allows schools or district to determine what information should print on a student’s transcript. The Transcript Definition page can be accessed from Grade Reporting | Configurations on the navigation tree. The school or district can also create as many variations of the transcript as desired. For example, some colleges require immunization records to be listed on a student’s transcript. Transcript Definitions can only be set at the School level, but can be pushed to other schools in the district by using the Push and Pull Setup Tables process.
The Transcript Definition page contains a Default transcript, which is the setup created for your original transcript. When this page displays, the Default record will automatically display with all options set up.


There are three tabs available on the Transcript Definition page.
- General – displays the overall formatting options available for the transcript
- Terms – allows you to select the Term Headings that will print
- TTP Things to Print – allows you to set up the tests, activities/awards and immunizations information that can be selected to print
General Tab ↑
The General tab displays the formatting options that are available for the specific Transcript Style selected. There are two styles of transcripts that can be selected from the Design Options tab. The Transcript Style selected will control what options are available. Please see the links below for specific options and settings that are available on each style of transcript.

The Standard (3-Column) Style is the current default transcript style with course history displayed in 3 columns. Click on this link for further information on the options available on the Standard (3-Column) Transcript Style.

The Enhanced (1-Column) Transcript Style displays all course history records on their own line, and can include much more information for each record. This Transcript Style will often be multiple pages long and is designed to fit into a standard business window envelope (either single or double-window style). Click on this link for further information on the options available on the Enhanced (1-Column) Transcript Style.

Terms Tab ↑
The Terms tab allows you to select the Semester/Term headings that will print on the transcript. State Term Codes are required for CALPADS End of Year reporting.
- Semester/Term Headings – allows you to enter text for the semester name to be printed on the Year/Term line above the courses taken that term (for example Fall).
- State Term Codes - allows you to populate the CALPADS translated terms for each of the terms that appear in the transcripts. These fields need to be populated for CALPADS EOY reporting.
- For users in Texas who use the Transcript Averaging feature, State Term codes 3: Summer Semester and code 8: MiniTerm are assumed terms used for summer school. The use of these codes will affect the auto-averaging of marks and the course linking function of this feature.

NOTE: The Terms and Things to Print tabs apply to all Transcript Definitions that have been set up, such as Default and FAX or IMM displayed above.
TTP - Things to Print Tab ↑
The TTP – Things to Print tab is utilized to select and define the different data to be printed on the transcript. This includes test scores (TST), college test scores (CTS), college articulations (CCC), immunization data (IMM), activities/awards (ACT), competency tests, physical fitness (PFT), student data (STU) and supplemental data (SUP).

To add an item to the TTP – Things to Print click on the Add Record button under the Things To Print collapsible header. Click on the Table drop down and the tables will display. Select a table from the drop down.
NOTE: TTP does not support adding information from a Custom table. You can only add from those tables listed above.
Click on the Test/Event and all tests or events related to the selected table will display. The remaining fields will change depending on the table selected. For example, if the IMM table is selected the Subtest/Part and Score will display N/A and the Grade Range will not be accessible. Enter the Print Options available.

If the CCC table is selected the Test/Event, Subtest/Part, Score, and Print Option can all remain at their default values (N/A, blank, or 0).

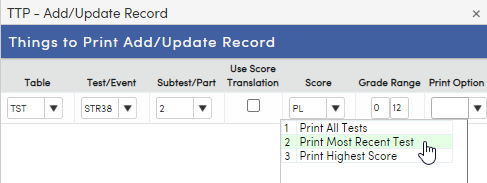
If the TST table is selected the remaining Test fields will display. Select the options available from the Subtest/Part, Score, Grade Range and Print Options.


When the option to Use Score Translation is selected the only print option available is N/A, which will store as a 0 in the Things to Print Print Option (TTP.PO) field.


Score Translations ↑
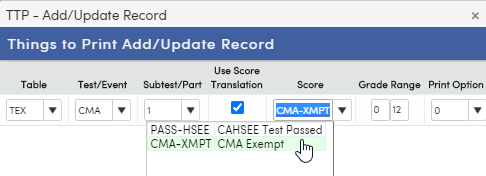
There is an opportunity to translate the scores for records in the Test Scores (TST) or Testing Exclusions (TEX) tables to a specific value, instead of the actual score. This is accomplished by first creating a record in TTP - Things to Print tab under the first collapsible header labeled Score Translations. Create a unique Code and Description, then select the translation for a specific value comparison for a field in either the TST or TEX table. The value in the Display field is what will print on the transcript for that record. The score value needs to include a decimal and 4 zeros (ie: 3.0000) to properly display. Records that do NOT meet that score comparison will NOT display on the transcript.


Next, create a corresponding record under the the Things To Print collapsible header for the same TST or TEX record, and select the proper subtest you wish to translate. Clicking the Use Score Translations (TST.UST) box will change the Score drop-down menu from the Test Score fields to the defined Score Translations.


This is how it will display on the transcript (currently only on the 1-Column Enhanced Transcript Style):


Note: If Print/Define TTP is checked on the Optional Areas tab on the Transcript Definitions page, but the TTP tab is blank (no items have been defined to print), certain test score records for the student WILL be printed on transcripts: SAT I, ACT, SAT II, and any other test from the CTS table
Adding a New Transcript Definition ↑
Variations of transcripts can be created from the Transcript Definition form. Click on the Add button in the right legend of the Transcript Definition page to add a new Transcript Code.

Type a 3-character code that will represent the new transcript. For example, COL is entered below for College. Enter a description in the Description box. Select the Copy settings from Default Transcript Definitions? option to copy only the required settings to this new transcript. Click on the Add Record button.
The new transcript definition will display under Default. Review all options and select the options appropriate for this transcript.
Another example can be a transcript definition meant to be printed by the parents and/or students with the word "Unofficial" in the title.

Allow Parents/Students to Print a Transcript ↑
Schools can define one or more transcript definition record to make available for parents and students to print via the Aeries portal. Each transcript can be titled with the word "Unofficial" so that it prints on the transcript report.
Security
The Parents security portal group and/or the Students security portal group must have the Transcript Report Printing security option selected in order for the group to view the Print button on the Transcripts page in the portal. Read permission to Transcripts must also be selected to access the Transcripts page in the portal.
Only an Aeries Administrator account will be able to access the Security area.

Setup
After adding a transcript definition record for an "unofficial" transcript as described in the previous section, mark the option Allow Parents/Students to Print.

Printing via the Portal
When the parent or student logs into the portal, the Print button will be available on the Transcripts page if security for the portal group has been set up.
From the menu go to Grade > Transcripts
When at least one transcript definition record is set to be available to parent/students, the Print button will display.
Clicking the Print button will run the report.

When more than one transcript definition is made available to parents/students, a drop-down window will appear for the parent to select the transcript of their choice.

Below is an example of a transcript with the word "Unofficial" printed on the top right corner.


