

Overview
Use Gradebook in the Aeries Teacher App to view and update student scores and to create, edit, delete, push and import assignments. To open it, tap the menu icon in the upper left and tap Gradebook, or tap the Gradebook icon in the tab bar at the bottom of the screen.

The Gradebooks page lists your gradebooks, grouped under Current Terms, Future Terms and Past Terms based on each gradebook’s start and end dates. If you don’t have Read permission to Gradebook (GBK), the page shows “Invalid Permissions To View Gradebook”.

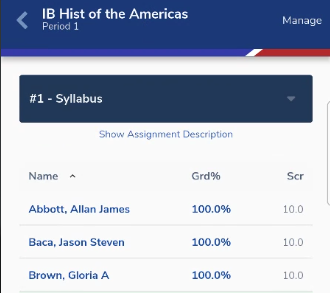
Open a gradebook to see its students for the selected assignment. Tap the assignment name at the top to open the Assignments list and choose another assignment. If the assignment has a description, tap Show Assignment Description to see it. The student list is managed from Manage Students in the Gradebook on the Aeries web Teacher Portal. Each student’s Grd% (grade percentage) and Scr (score) for the assignment are shown; tap a column heading to sort by Name, Grd% or Scr. Dropped students are highlighted yellow and listed at the bottom, unless the gradebook hides dropped students.
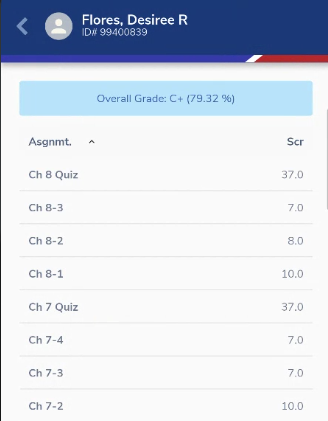
Tap a student’s name to see all of that student’s assignments in this gradebook. The header shows the student’s name, ID# and photo, and a bar at the top shows the student’s Overall Grade (mark and percentage). Each row lists the Assignment name and the Score. Tap the Assignment or Score column heading to sort. Tap an assignment to edit that student’s score.
Editing Student Scores↑
To edit a student’s score, tap the student’s Grd% or Scr value. The score editor opens at the bottom of the screen, where you can change Date Completed, Score, Correct Possible, Points, Status and Comment. Earned is calculated for you. Use the < and > arrows to move to the previous or next student. Tap Save in the top right to save your changes. Tap X to cancel; if you made changes, the app asks “You have unsaved changes to grades, discard them?”. For rubric assignments the Grd% column is hidden and Correct Possible, Earned and Points can’t be changed. If you don’t have Update permission to Gradebook (GBK), the editor shows “Invalid GBK Update Permissions” and there is no Save button.


Custom Marks↑
Custom Marks are supported when viewing and editing gradebook scores. More information about the Custom Marks feature can be found in this document: Gradebook Custom Marks.
When you’re editing the Score field, a Change Mark button appears below the number pad. It isn’t shown for assignments that use narrative grading.

When the Change Mark button is tapped, a window will display the available custom marks that have been set up on the web including existing marks TX and NA.

When a student has a score higher than the max, the item color will display as light mint green.
When student has a custom mark that is type M (Missing) or type (TX) that isn’t ‘NA’, the color will display as Orange.

Note: Custom Mark types of ‘TX’ set the correct possible and points possible to 0. This is the same for NA.
Narrative grading dropdown options cannot match custom mark options. Any values in the Custom Marks list should not be included in the Narrative Grading list.
Mass Grading Options↑
Mass grading options are available in the score editor. Under Mass Grading Options, choose what to apply in Mass Grade By: Score, Status or Comment. For assignments graded by standards, Correct Possible and Date Completed are also available. If the assignment uses narrative grading, Score becomes Narrative Score. Tap Copy Student’s to copy the current student’s value, then tap Begin.
For example, to add a status code for several students, choose Status, select the code (AM - Absent - Able to Make Up) and tap Begin. A list of students in the class appears. Check the students to update, or select all students. When you are ready, tap the green bar at the top, which shows what you are applying (in this example, “Apply Status ‘AM’ to Selected Student(s)”). The change is saved right away.


Once completed, a message will display to let you know the records have been successfully added.

Add or Edit Assignment↑
To create, push or import an assignment, open the Gradebook tab and select a gradebook. Tap Manage in the top right. The Manage Assignments screen lists the gradebook’s assignments; use the two menus at the top to sort them (Descending/Ascending; By Date, By Assign #, By Name). Tap an assignment to open it in Edit Assignment, make your changes and tap Save; the app shows “Assignment saved successfully”.
Three buttons appear in the bottom right: the blue download arrow is Import, the blue upload arrow is Push, and the green page-with-plus icon is Create. Create is shown only if you have Update permission to Gradebook (GBK).

Import Assignment↑
On the “Import Assignment Into” screen, select the teacher whose assignment you are importing, then select the gradebook. A list of assignments will appear for the selected gradebook. You can import any assignment from any teacher’s gradebook. Exception: if your school allows teacher-created standards, an assignment that uses a teacher-created standard appears in the list only when both gradebooks belong to the same teacher and the same course.
To import the assignment, tap the Import button to the left of the assignment name. A green check mark will appear once the assignment was successfully imported. The imported assignment gets the next available number and is added to every gradebook linked to this one. If you have linked gradebooks with different assignment information, the screen warns you to be careful about editing or adding assignments.


Push Assignment↑
On the “Push Assignment From” screen, select the assignment from the list that will be pushed to another gradebook. If you have gradebooks that are linked, they will be displayed by groups. When pushing an assignment to a linked gradebook, the assignment will be copied to all gradebooks linked to that selected group. Assignments can only be pushed to gradebooks with defined categories. Teacher-created assignment standards can only be pushed to gradebooks that are associated with the same course and teacher. If the gradebook has no assignments, the app shows “Gradebook has no assignments”.
To push the assignment, tap the Push button to the left of the gradebook selected. A green check mark will appear once the assignment was successfully copied.


Create Assignment↑
Tap the green Create button to open the Edit Assignment page. If the gradebook has no assignment categories yet, the app shows “At least one Assignment Category must be created before the creation of an Assignment.” The assignment number will automatically be populated with the next available assignment number for the gradebook selected. You can change the number. If you enter a number that is already in use, the app asks: “The Assignment Number already exists. Are you sure you want to change all assignment numbers between the original number and this new one?” Tap Yes to renumber the assignments in between.
Fill in the assignment details. Name is required. Everything else is optional or has a default: Number, Description, Type (Summative or Formative), Category, Narrative Grading, Assigned On, Due On, # Correct Possible, Points Possible, Grading Completed, Visible To Portal, Score Visible To Portal, Drop Box, Extra Credit and Standards. If # Correct Possible or Points Possible is 0 and the other has a value, the app copies the value across. Some fields appear only in certain cases: Drop Box appears only when the district uses Briefcase, and checking it adds a Due Time field; Standards appears only when the school uses standards-based grading; in a rubric gradebook, Rubric replaces Extra Credit; and when Extra Credit is checked, Narrative Grading, # Correct Possible and Points Possible are hidden.
By default, a new assignment is added to every gradebook linked to this one. To choose which gradebooks get it instead, check Push New Assignment To Selected Gradebooks, then check each gradebook (or group) to copy it to. Gradebooks in the current linked group are checked to start with. Only gradebooks that have assignment categories can be selected.
Lastly, tap Save in the top right corner. If something needs fixing, an “Unable To Save Assignment” message lists it, for example “Name is required.”, “Due Date must be greater than or equal to Assigned Date.” or “Number Correct Possible can’t be 0 when Points Possible > 0.”


Delete Assignment↑
To delete an assignment, either swipe it to the left on the Manage Assignments screen and tap Delete, or open the assignment and tap the red Delete button at the bottom of Edit Assignment. The app asks “Are you sure you want to delete ‘[assignment name]’ assignment?”. Deleting requires Delete permission to Gradebook (GBK).