

The Geographical Boundaries page lets your district define attendance zones — the geographic areas that map student home addresses to specific schools. Once configured, the system automatically determines the correct school of residence for any address submitted during enrollment or boundary review. This page is designed for staff users of the Admin Portal who manage district configuration.
Districts integrated with Aeries SIS can choose between two boundary systems:
- Geofencing - Resolve addresses using boundary polygon files you upload and manage on this page. This is the workflow described throughout most of this article.
- Aeries Streets - Resolve addresses using the Streets table already configured in your Aeries SIS, reached through your SIS Integration connection.
Districts that are not integrated with Aeries SIS use Geofencing only.
From this page, you can:
- Upload, validate, and delete boundary files for any school year
- View how attendance zones and school overrides work together
- Test any address against your configured zones
- Create per-school boundary overrides for non-standard catchment areas
- Choose the boundary system your district uses (Geofencing or Aeries Streets)
- Choose which schools enforce boundaries per school year (Aeries Streets)
To access this page, navigate to Administration > District & Schools > Geographical Boundaries in the left sidebar.
Table of Contents ↑
Prerequisites
Concepts & Terminology
Page Layout
Choosing a Boundary System
When to Use Geographical Boundaries
Before Uploading
Uploading District Boundaries (Geofencing)
Validation Results (Geofencing)
Managing Existing Boundaries (Geofencing)
Map & Zone List (Geofencing)
Individual School Boundaries (Geofencing)
School Boundary Enforcement (Aeries Streets)
Testing an Address
Frequently Asked Questions
Prerequisites ↑
Access to Geographical Boundaries features is restricted to the Admin role. Only Admin users can upload, validate, delete, and manage boundary files and school overrides.
| Action | Admin |
|---|---|
| View district map and zones | Yes |
| Test an address against zones | Yes |
| Upload district boundary file | Yes |
| Delete a boundary record | Yes |
| Upload per-school override | Yes |
Aeries Streets mode additionally requires an active Aeries SIS integration. The Boundary System setting only appears when a SIS connection has been configured on the SIS Integrations page and its status is Connected. Without a connected integration, the district uses Geofencing and the Boundary System setting is hidden.
Concepts & Terminology ↑

| Term | Meaning |
|---|---|
| Attendance Zone | A polygon (boundary) tied to one or more schools by grade band (elementary, middle, high). An address that falls inside a zone is routed to those schools. |
| District Boundary | The full set of zones uploaded for the entire district, typically derived from a single GeoJSON or shapefile import for a school year. |
| School Override | A per-school polygon that supersedes the district-wide zone for that single school. Used when a school has a non-standard catchment area. |
| GeoJSON / Shapefile | Industry-standard geographic file formats. Shapefiles are uploaded as a .zip; GeoJSON is uploaded as a .geojson file. |
| School Year Inheritance | The system automatically uses boundaries from the prior school year if no new boundary is uploaded for the current year. |
| Geocoding | Converting a human-readable address into latitude/longitude coordinates. |
| Polygon | A closed shape defining a zone's boundary on the map. |
| Boundary System | The method your district uses to resolve an address to a school: Geofencing (uploaded polygon files) or Aeries Streets (the Aeries SIS Streets table). |
| Streets Table | Address-range data maintained in Aeries SIS that maps residence addresses to a school of residence by grade level. Used when the boundary system is set to Aeries Streets. |
Page Layout ↑
The Geographical Boundaries page is organized into two areas, with a school year selector in the page header that determines which year's boundary record is loaded. The selector defaults to the current school year (July 1 cutoff).
- District Boundaries — manage the district-wide boundary file for the selected school year. This is the primary workspace.
- School Boundaries — manage per-school overrides for individual schools that need their own polygon.
Choosing a Boundary System ↑
When your district is connected to Aeries SIS, a Boundary System setting appears on the Geographical Boundaries tab with two options:
- Geofencing - Resolve addresses to schools using uploaded boundary polygons.
- Aeries Streets - Resolve addresses to schools using the Aeries SIS Streets table.

When you select Aeries Streets, the map, polygons, and boundary-file tools are hidden, and the page displays the message: “Aeries is referencing the Streets table via the API connection defined in the SIS Integrations page.”
In this mode you do not upload boundary files. Instead, you choose which schools enforce boundaries using the School Boundary Enforcement panel (see School Boundary Enforcement (Aeries Streets) below), and Aeries determines each address's school of residence directly from the Streets table.
When to Use Geographical Boundaries ↑
Use this page in the following situations:
- Before each new school year — upload or inherit the boundary set for the upcoming year, ideally before guardian enrollment opens. The system automatically inherits from the prior year if no new file is needed.
- After a redistricting decision — re-export from your GIS system and upload a new file for the affected year.
- When a school opens or closes — adjust polygons and update zone properties so the new or closed school is reflected.
- During address troubleshooting — use the Address Test Search to confirm what zone an address falls into.
Before Uploading ↑
System Requirements
Before uploading a boundary file, confirm the following:
- Schools must already exist in District & Schools.
- You must have a GeoJSON file or zipped shapefile.
Preparing Your Boundary File
To prepare your GIS boundary file for upload:
- Export attendance-zone polygons from your GIS system (ArcGIS, QGIS, etc.).
- Save as
.geojson(or.json), or zip the shapefile components (.shp,.shx,.dbf,.prj) into a single.zip. The maximum upload size is 10 MB.
Uploading District Boundaries (Geofencing) ↑
To upload a district boundary file:
- Open Geographical Boundaries and confirm you are in the District Boundaries area.
- Use the school-year selector in the header to choose the year this file applies to (e.g., 2025–2026).
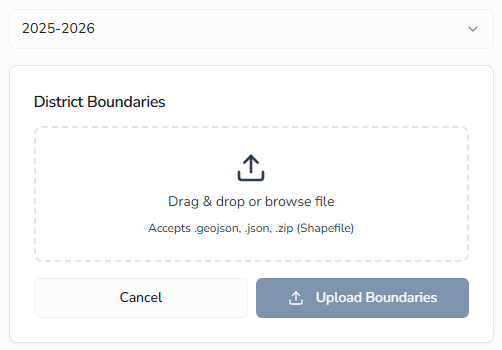
- Click Upload Boundaries.
- Choose your
.geojson/.jsonfile or your zipped shapefile (.zip) from disk (10 MB maximum). - Preview the boundaries on the map and review the Validation Results (see below).
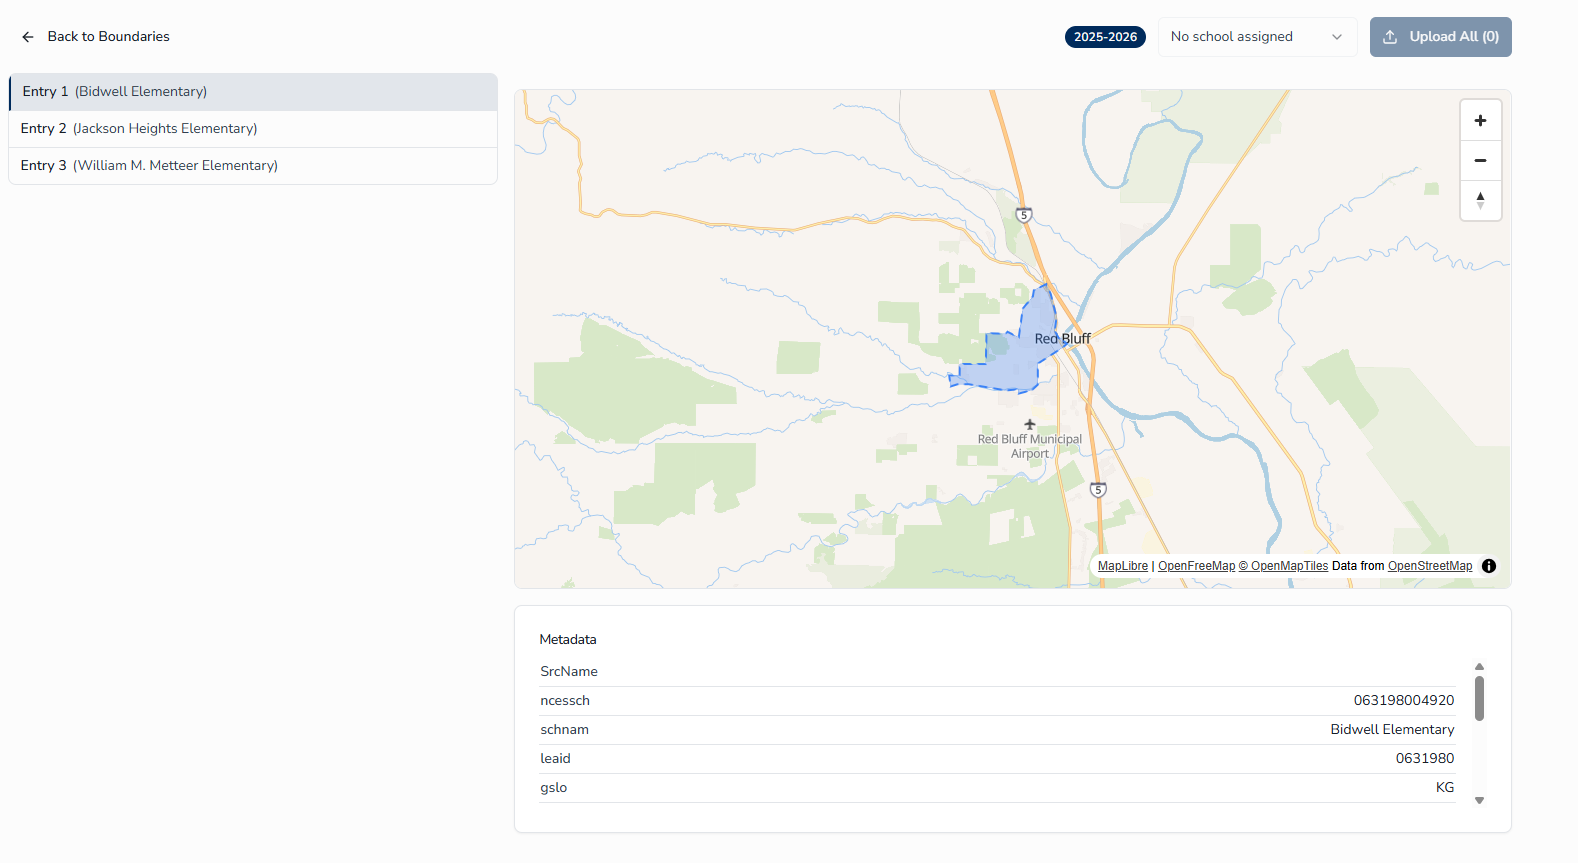
- The detected boundary polygons are listed as entries. For each entry, choose the school it represents from the school selector.
- Click Upload All to save the assignments.

Validation Results (Geofencing) ↑
After you select a file and before you assign polygons to schools, the system checks the file and displays a Validation Results panel so you can confirm the upload is sound. The panel reports the following checks:
| Check | What it confirms |
|---|---|
| Valid GeoJSON/Shapefile format | The file was read successfully as a supported format. If the file cannot be parsed, this check fails and the accompanying detail explains the parse error. |
| Zone count | The number of zones (polygons) detected in the file — shown as "N zones found" — so you can confirm the file contains the boundaries you expect before assigning them. |
Review the Validation Results before proceeding. If the format check fails, correct the file in your GIS system and upload again; if the zone count is not what you expect, verify you exported the correct layer.
Managing Existing Boundaries (Geofencing) ↑
Deleting a Boundary Record
To remove the boundary record for the selected school year:
- On the Boundary Status card, click Delete.
- Confirm the deletion in the dialog that appears.

Map & Zone List (Geofencing) ↑
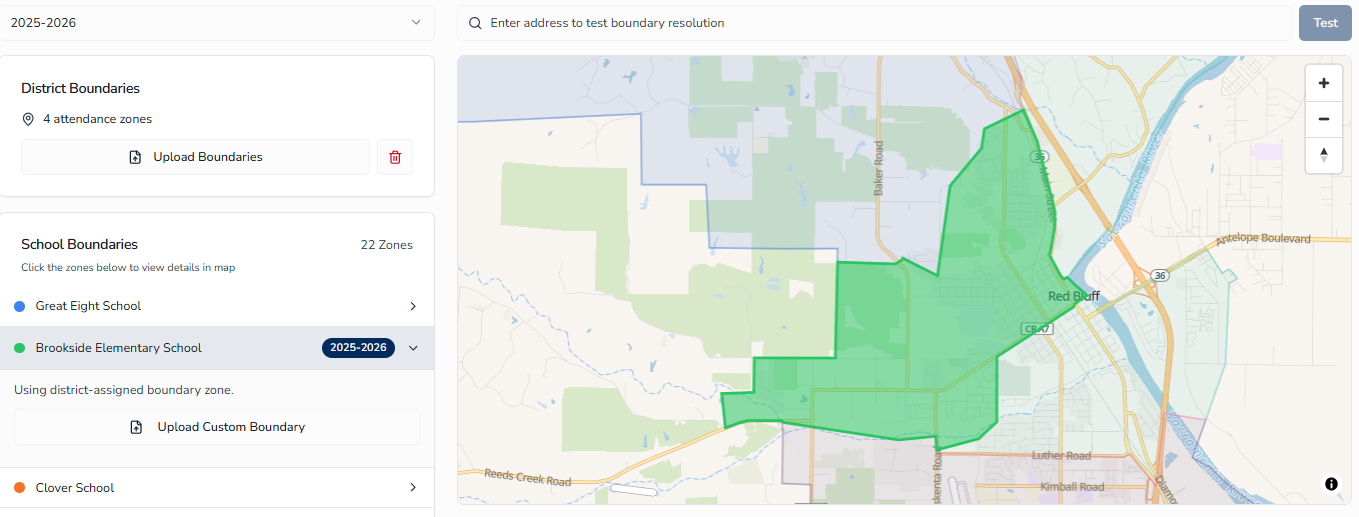
The District Boundaries area provides several tools for reviewing your boundary configuration:
- Map panel — renders all zones for the selected year. Clicking a zone selects it and highlights its row in the list.
- Zone list — every polygon with its ID and matched school(s). Use the visibility toggles to show or hide individual zones on the map.
- School Detail — see an expanded view of the boundary of a single school.
- Zone summary table — counts of zones per grade band and per school, useful for spot-checking coverage.
Individual School Boundaries (Geofencing) ↑
Use the School Boundaries area to upload boundaries for an individual school (for example, a magnet program with a custom catchment).

Uploading a School Boundary
To upload a boundary override for a specific school:
- Open the School Boundaries area and locate the school in the list.
- Use the per-school upload control to select a GeoJSON file or a zipped shapefile for that school.
- Click Save.
Once saved, the school is marked with its own custom boundary, and its override card shows the uploaded file name. Address tests against this school will use the override polygon instead of the district file.
Removing a School Boundary
To remove an override and revert a school to the district boundary:
- Open the School Boundaries area and open the school's row.
- Use the per-school delete control to remove the override.
- Confirm the deletion in the dialog that appears.
School Boundary Enforcement (Aeries Streets) ↑
When your boundary system is set to Aeries Streets, use the School Boundary Enforcement panel to choose which schools enforce geographic boundaries for the selected school year. Each school appears as a row with an on/off toggle. Turn a school on to have Aeries enforce its Streets-based boundary during enrollment; leave it off to skip enforcement for that school.
To configure enforcement:
- Confirm the boundary system is set to Aeries Streets.
- Use the school-year selector in the header to choose the year you are configuring.
- Toggle each school on or off as needed. Changes save automatically.
Enabling Boundary Enforcement on a Form
Choosing a boundary system and enabling schools does not, by itself, enforce boundaries on any single form. A form only enforces boundaries when Enforce Geographic Boundaries is switched on in that form's settings. When enabled, the form displays the message: “When enabled, this form will only be shown to families whose address falls within the school boundary of the form's assigned school(s).”
This requirement applies to both boundary systems.
Testing an Address ↑
The Address Test Search lets you confirm which schools an address resolves to.
Running an Address Test
To test an address against the configured zones:
- Open the Test Address Boundary panel.
- Type a full address (street, city, state).
- Press Enter or click Test.
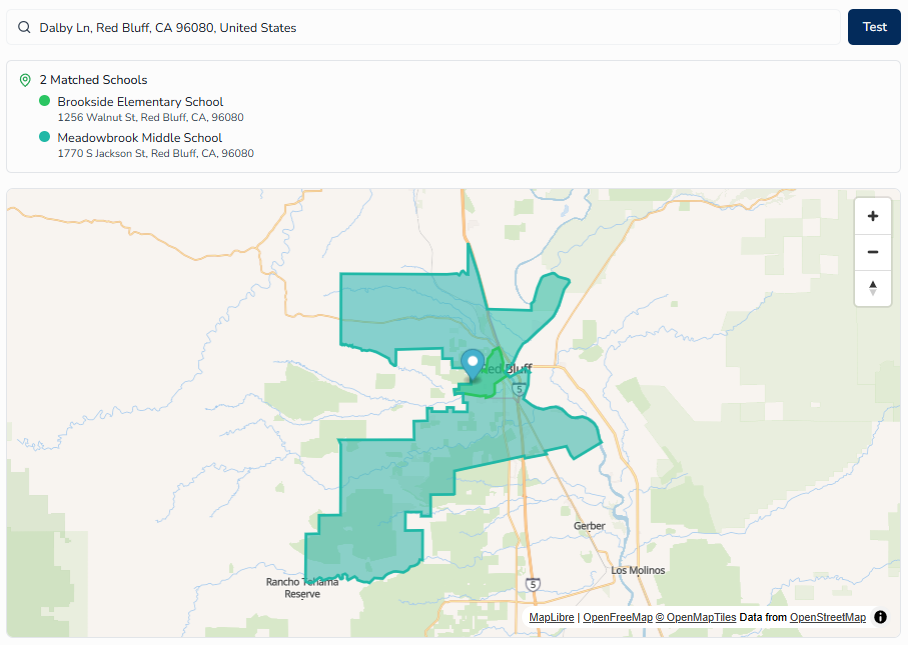
- Review the result:
- A map pin marks the tested location.
- Matching Schools — every school whose zone contains this address. Multiple matches are normal when grade-level zones overlap.
If No Schools Match
If the test returns no matching schools, the tool reports that no matching school boundary was found for the address. Check the following:
- Confirm the address is inside the district's boundary polygons.
- Verify the boundary file for the selected school year is loaded.
- Check the Zone List for gaps that may leave the address uncovered.
Frequently Asked Questions ↑
Boundaries exist for other years but not the selected year — how do I add one?
The system automatically inherits the most recent prior year's boundaries. If you need to upload a new file for this year, click Upload Boundaries and choose your updated GeoJSON or zipped shapefile.
An address test shows "Outside District" — what does that mean?
The address geocoded successfully but its coordinates fall outside every zone polygon. Confirm the address with the family and route to a manual review.
How does the system handle boundaries for new school years?
When you switch to a new school year with no boundary record, the system automatically inherits the boundaries from the most recent prior year. This inheritance is instant and requires no manual action. You can delete the inherited record and upload a new one if boundaries have changed, or leave the inherited record in place.
What's the difference between Geofencing and Aeries Streets?
Geofencing resolves an address by geocoding it to coordinates and testing which uploaded boundary polygon it falls inside. Aeries Streets resolves an address directly against the Streets table maintained in Aeries SIS, which returns a school of residence by grade level. Aeries Streets requires a connected Aeries SIS integration; Geofencing does not.
Why does an Aeries Streets lookup need the student's grade?
The Streets table returns a school of residence per grade level, so a grade is required to resolve the correct school. If a grade is not available for a lookup, the system falls back to geocoding rather than returning a placement.
An address didn't resolve to a school in Aeries Streets mode — why?
If the Streets table cannot uniquely match the address (for example, the address is ambiguous or incomplete), no school is assigned and the family is asked to provide a more complete address. This is intentional — a blank result is preferred over placing a student at the wrong school.
Does the street-suffix spelling matter (e.g., "Lane" vs. "Ln")?
No. Aeries Streets lookups automatically try both the abbreviated and expanded suffix forms, so families do not need to match your district's exact data-entry style.
Which school years does Aeries Streets support?
Aeries Streets resolves placements for the current and next school year, as defined by your Aeries SIS. A form pointed at a school year that is neither the current nor the next year in your SIS will not resolve an address through Streets.