

The District & Schools page enables administrators to manage the organizational hierarchy, school information, contact details, geographical boundaries, and privacy notices for Aeries Enroll Path. Use this page to configure district-level settings that appear throughout the parent-facing enrollment portal, add or edit individual school records, define school catchment areas, and customize the FERPA/COPPA consent shown to parents.
From this page, administrators can:
- Configure district name, contact information, address, and branding
- Add, edit, search, and remove schools within the district
- Upload and manage geographical boundary data for the district and individual schools
- Customize the privacy and data rights notice presented to parents during enrollment
To access this page, navigate to Administration > District & Schools in the left sidebar.
Table of Contents ↑
Prerequisites
First-Time Setup
District Tab
Schools Tab
Geographical Boundaries Tab
Privacy Settings Tab
Tips for Efficiency
Prerequisites ↑
To access the District & Schools page, you must have the Administrator security role assigned to your account. Users without this role see an "Access denied" message with a Return to login button; they are not redirected to a tenant home page.
| Role | Access Level |
|---|---|
| Administrator | Full access to view and edit district, school, boundary, and privacy settings |
| All other roles | No access |
First-Time Setup ↑
The first time you open the District & Schools page for a new tenant, the page displays a one-time setup form instead of the tabbed interface. Complete this form to create your district record. After saving, the page reloads into the standard tabbed view.
Creating Your District
To create your district record:
- Complete the Basic Information section: District Name, Description (optional), and State Code (optional).
- Complete the Contact & Address section: District Email, District Phone, and the full address (Street, City, State, ZIP, Country).
- Optionally enter the Superintendent Name.
- Optionally upload a Logo by dragging an image onto the upload area or clicking Choose File.
- Click Save. The page reloads into the standard tabbed view.
District Tab ↑
The District tab displays your district's information in read-only form, with an Edit district button to open the edit dialog. The district logo and contact information appear in the parent portal header and in system-generated emails.
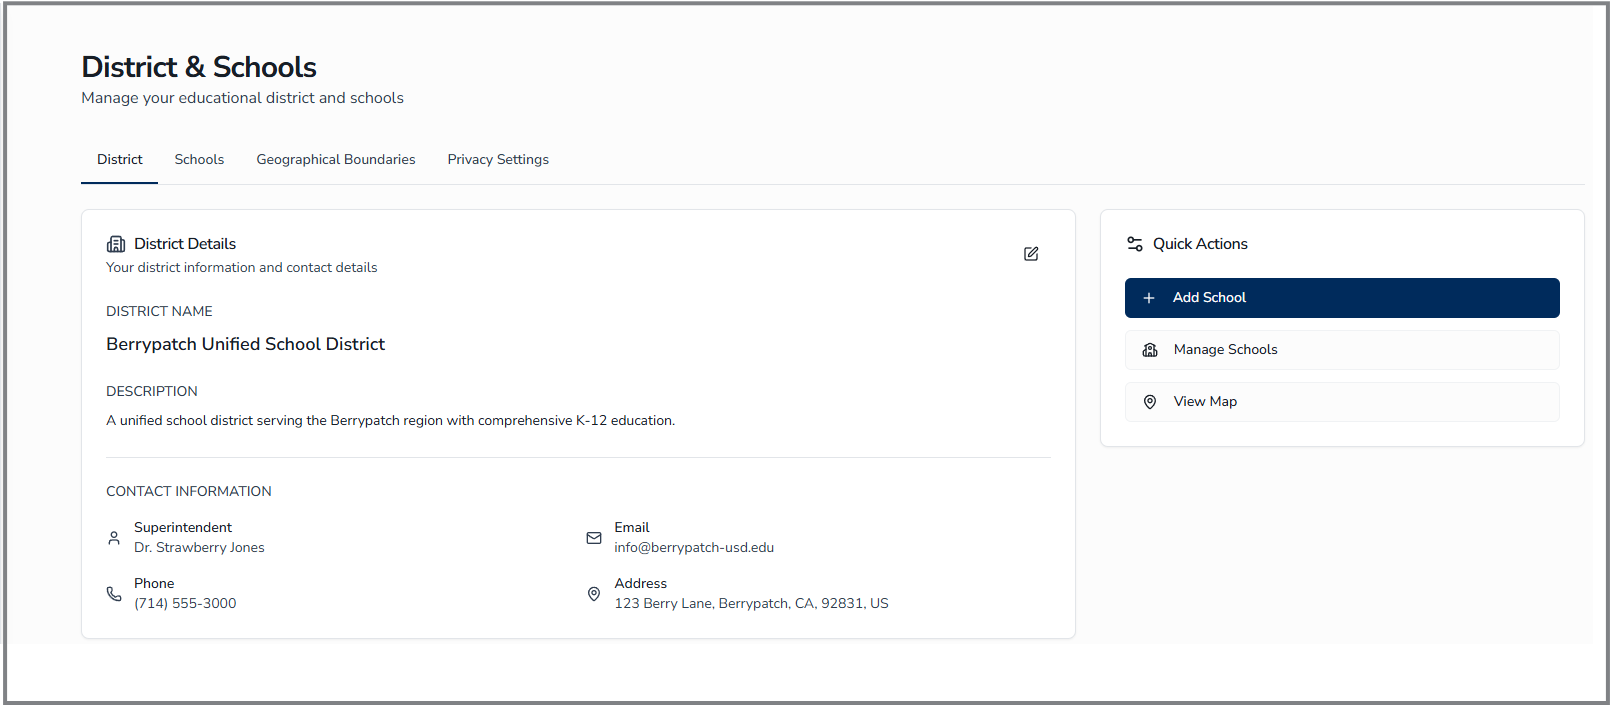
District Details
The District Details card displays the following information when a district is configured:
- District Name
- Description
- Superintendent, Email, Phone, and Address under the Contact Information heading
Quick Actions
The Quick Actions panel on the right side of the District tab provides shortcut buttons:
- Add School - Opens the Add School dialog
- Manage Schools - Switches to the Schools tab
- View Map - Switches to the Geographical Boundaries tab
District Fields
The following fields are available in the Edit District Information dialog:
| Field | Description | Required |
|---|---|---|
| District Name | Official name of the district | Yes |
| Description | Short description visible to parents | No |
| State Code | State-assigned identifier (numeric only); for example, the California CDS code or the Texas CDC code | No |
| District Email | Primary contact email; must be in valid email format. Required by default (may be optional depending on your district's configuration). | Yes* |
| District Phone | Main phone number; auto-formats as you type. The system validates against real numbering plans, so use a valid area code. | Yes |
| Street Address Line 1 | Physical address. When Geographical Boundaries is enabled, this field offers address autocomplete suggestions. | Yes |
| Street Address Line 2 | Apartment, suite, unit, building, or floor | No |
| City, State/Province, ZIP/Postal Code, Country | Complete address details. ZIP must be in 5-digit (12345) or 9-digit (12345-6789) US format. Country defaults to United States. | Yes |
| Superintendent Name | District leadership contact displayed on the District tab | No |
| Logo | Branding image displayed in the parent portal header and emails. Supported formats: JPG, PNG, WEBP, GIF, BMP, SVG, HEIC, AVIF, HEIF, TIFF (max 5 MB). | No |
Editing District Information
To update your district details:
- Click the District tab.
- Click the Edit district button (pencil icon) in the District Details card.
- Update the desired fields.
- Click Save.

Schools Tab ↑
The Schools tab manages the schools in your district. Schools can be displayed as a sortable list (default) or as a card grid; the chosen view is remembered across sessions on the same browser.
Empty State
When no schools exist, the tab shows a "No Schools Yet" message with a prompt to add the first school. Click Add School to begin.

Searching and Filtering Schools
To find specific schools:
- Click the Schools tab.
- Type a school name in the Search schools... input. Results update as you type.
- Optionally, choose a grade from the All Grades dropdown to limit the list to schools serving that grade.
The list updates automatically as you change the search text or grade filter.
Switching Between List and Grid View
Use the List / Grid toggle above the school list to choose how schools are displayed. The List view (default) shows a table with School Name (and school code) in one column and Location in another; each row has a chevron to expand inline details and a menu icon (three dots) for Edit and Delete actions. The Grid view displays schools as cards, each showing the school logo, name, principal, contact information, supported grade badges, program count, and boundary status. Your view preference is saved automatically.

School Fields
When adding or editing a school, the following fields are available:
| Field | Description | Required |
|---|---|---|
| School Code | Aeries School Code (LOC.CD) | Yes |
| School Name | Official name of the school | Yes |
| School Phone | Main phone number; auto-formats and validates against real numbering plans | Yes |
| School Email | Contact email for the school. By default a single address is required. When multi-recipient email is enabled for your district, this field becomes optional and accepts multiple addresses separated by a comma or semicolon — notification emails are then sent to all listed addresses. | Yes* |
| Email Notifications | Toggle to enable or disable automatic email notifications to the School Email address when a new student enrollment is submitted. When off, no submission notification is sent to this school. Availability depends on your district's configuration. | No |
| Principal Name | School leadership contact displayed to parents | No |
| Address Line 1, Line 2, City, State, ZIP, Country | Physical address of the school. When Geographical Boundaries is enabled, Address Line 1 offers autocomplete suggestions. | Yes (except Line 2) |
| Supported Grades | Predefined checkboxes for Pre-K, TK, K, and 1 through 12. Select All and Clear buttons toggle the entire predefined set. Use the OR Add Custom Grade input to add non-standard grades such as Adult Education. | Yes (at least one) |
| Supported Programs | Special programs offered at the school. Enter a Program Code and Program Name, then click Add to include the program (for example, a Gifted and Talented, Special Education, or Dual Immersion program). | No |
| Logo | Branding image displayed on the school card and in school-specific communications. Supported formats: JPG, PNG, WEBP, GIF, BMP, SVG, HEIC, AVIF, HEIF, TIFF (max 5 MB). | No |
Adding a School
To add a new school:
- Click the Schools tab.
- Click the Add School button.
- In the Basic Information section, enter the School Code, School Name, School Phone, and School Email (in that order), and (optionally) Principal Name. If the Email Notifications toggle is available, it also appears in this section, after Principal Name and before the Address section — turn it on to receive an automatic email at the School Email address each time a new enrollment is submitted for this school.
- In the Address section, enter the school's physical address. The State/Province dropdown is filtered to the selected Country.
- In the Supported Grades section, check each grade the school serves. To add a grade not in the predefined list, type its name in the OR Add Custom Grade field and click Add. Use the Select All and Clear buttons to toggle all predefined grades at once.
- (Optional) In the Supported Programs section, enter a Program Code and Program Name and click Add. Repeat for each program. Each program appears as a removable tag below the input fields.
- (Optional) Upload a Logo.
- Click Save. The school is added to the schools list and is automatically linked to your district.

Editing a School
To edit an existing school's information:
- Click the Schools tab.
- Locate the school in the list (use the search bar to filter if needed).
- Click the menu icon (three dots) at the end of the school's row.
- Click Edit. The Edit School dialog opens with all fields pre-filled with the school's current data.
- Update any of the fields: School Code, School Name, School Phone, School Email, Email Notifications toggle, Principal Name, Address, Supported Grades, Supported Programs, or Logo.
- Click Save. Your changes are saved immediately and reflected in the schools list.
Deleting a School
To remove a school from the district:
- Click the Schools tab.
- Open the school's action menu and click Delete.
- In the Confirmation dialog, type the exact school name in the confirmation field.
- Click Delete.

Geographical Boundaries Tab ↑
The Geographical Boundaries tab enables administrators to define district-level boundaries and per-school catchment zones for a given school year, visualize them on an interactive map, and test which zone an arbitrary address resolves to. This information drives enrollment eligibility for boundary-aware schools.

Selecting a School Year
The School Year dropdown underneath the Geographical Boundaries tab scopes every action — uploads, deletions, and the per-school zone list — to the selected year. Each school year stores its own boundary data, allowing past and future configurations to coexist. If no boundaries are uploaded for the selected year, the system automatically inherits the most recent prior year's boundaries.
Uploading District Boundaries
The District Boundaries card uploads a single boundary file containing one or more polygons that define your district's geographic regions. After uploading, you assign each polygon to a specific school.
To upload district boundaries:
- Confirm the correct School Year is selected.
- In the District Boundaries card, click Upload Boundaries.
- Select a GeoJSON file (
.geojsonor.json) or a zipped shapefile (a single.zipcontaining the.shp,.shx,.dbf, and.prjcomponents). The maximum file size is 10 MB. - Preview the boundaries and review the Validation Results on the map.
- Click Upload Boundaries to proceed to the assignment view.
- For each detected polygon, choose the school it represents from the school selector, then click Upload All to save the assignments.
.zip containing the .shp, .shx, .dbf, and .prj components. GeoJSON files may use the .geojson or .json extension. Standard GIS coordinate systems are supported; the maximum upload size is 10 MB.Managing School Boundaries
The School Boundaries panel lists every school in the district for the selected school year, showing a school-year badge, the number of zones assigned, and expandable cards for any per-school override.
Click any school in the list to see its boundary highlighted on the map. To upload a custom override for a specific school, use the per-school upload control on the school's row. To remove a custom override, use the per-school delete control. A school using its own uploaded boundary shows an indicator (and, where applicable, an "Inherited from [year]" note when it is using a prior year's data).
Testing an Address
The address bar above the map (the Boundary Test Tool) lets you check which school zone any address falls within for the current school year. Type an address into the bar and click Test to see a map pin and the matching school(s). Multiple matches are normal when grade-level zones overlap. If no zone contains the address, the tool reports that no matching school boundary was found.
Deleting Boundaries
To remove all district boundaries for a school year, use the Delete control in the District Boundaries card. You can choose whether to also delete per-school overrides during deletion. Deleting affects the selected school year only; once removed, the system inherits the most recent prior year's boundaries.
Privacy Settings Tab ↑
The Privacy Settings tab customizes the privacy and data rights notices that parents see across Aeries Enroll Path. The tab contains two sub-tabs:
- Student Enrollment Consent - The FERPA/COPPA notice shown to a guardian before they submit an enrollment.
- Guardian Account Consent - The data privacy notice shown to parents during account sign-up.

Student Enrollment Consent
The Student Enrollment Consent sub-tab controls the FERPA/COPPA privacy notice presented before a guardian submits an enrollment. The Body Content field is blank by default — your district must enter the appropriate legal notice. Default FERPA/COPPA wording is provided only in the consent checkbox label, which you can customize.

Consent Fields
| Field | Description | Required |
|---|---|---|
| Title | Headline shown at the top of the consent screen | Yes |
| Description | Brief sub-line beneath the title | No |
| Body Content | Full-text notice. Edited in a rich-text editor that supports formatting, font sizes, lists, links, images, blockquotes, and a formatted-box element. This field is blank by default — your district must enter the appropriate legal notice before publishing. | No |
| Privacy Policy URL | Optional link to the district's full privacy policy. Must use http:// or https://. | No |
| URL Label | Display text for the privacy policy link (for example, "Read the full Privacy Policy") | No |
| Checkbox Label | Text shown next to the consent checkbox the guardian must check to proceed. The default FERPA/COPPA acknowledgement wording appears here and can be customized. | Yes |
Editing the Consent Notice
To update the Student Enrollment Consent notice:
- On the Privacy Settings tab, click the Student Enrollment Consent sub-tab.
- Update the Title, Description, Body Content, Privacy Policy URL, URL Label, and Checkbox Label as needed.
- Click Save & Publish. The notice is published to the parent enrollment flow immediately.
To reset all fields back to their default values:
- Click the Reset button on the Student Enrollment Consent tab.
- Review the confirmation dialog.
- Click Confirm to restore all editable fields to their defaults (Title, Description, Body Content, URL fields, and Checkbox Label are cleared).
- Click Save & Publish to publish the reset content.
Previewing the Guardian View
To see how the notice will appear to parents, click Preview in the top-right of the consent editor. The preview displays the title, description, body content, optional policy link, and consent checkbox in the same layout used during enrollment.
Managing Translations
Click Translations in the top-right of the consent editor to open the Translations dialog. From here you can provide translated versions of the consent notice for every language your district supports. Each translation includes its own Title, Description, Body Content, URL Label, and Checkbox Label, and is shown to guardians whose preferred language matches. The Privacy Policy URL is not translatable and stays the same for every language.
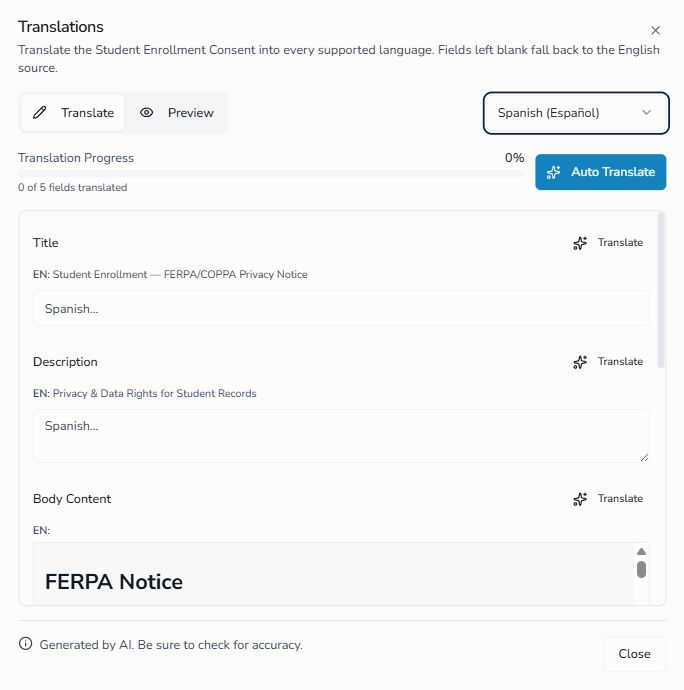
The Translations dialog has two view modes selectable from the toggle in the top-left:
- Translate (default) - Edit the field translations side-by-side with the English source.
- Preview - See how the consent screen renders in the selected language.
Auto Translate (AI). The Translations dialog includes an AI-powered translation workflow that can translate every field at once or translate a single field on demand. A progress bar and a status note keep you informed as the translation runs, and a notice at the bottom of the dialog reminds you that AI translations should be reviewed for accuracy.
To auto translate every field for a language:
- Open the Translations dialog from the consent editor.
- Select a language from the language selector in the top-right.
- Click Auto Translate in the action bar above the fields. A progress bar shows how many fields have been translated.
- If you need to halt the run, click Stop Translating. Fields that were already translated remain in place.
- Review and edit each translated field as needed.
- Click Save to publish the translation for that language.
To auto translate a single field, click the Translate button at the top-right of any field row in the editor. The button shows a spinner while that field is being translated.
Saving and deleting translations. After making changes, click Save in the action bar to publish the translation for the selected language. To remove a translation completely, click the trash icon next to Save and confirm in the dialog. Once deleted, guardians using that language fall back to the English source until a new translation is provided.
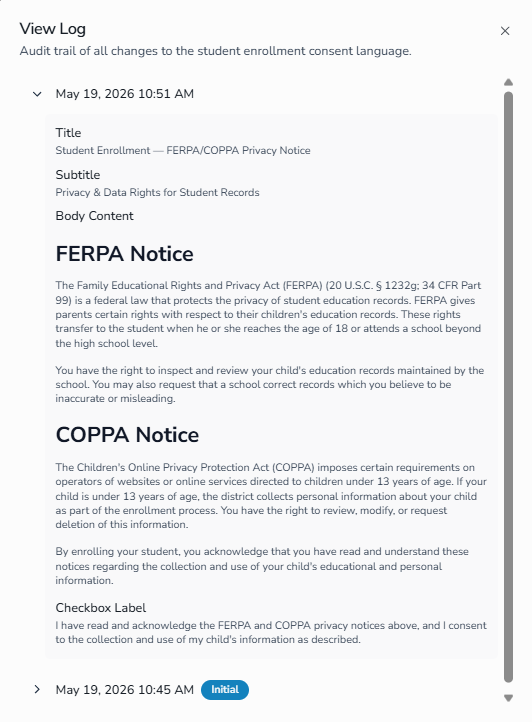
Viewing Version History
Click View Log in the top-right of the consent editor to see the version history of the Student Enrollment Consent notice. The history records each save with a timestamp. Version history is kept for the Student Enrollment Consent tab only; the Guardian Account Consent tab does not maintain a version history.
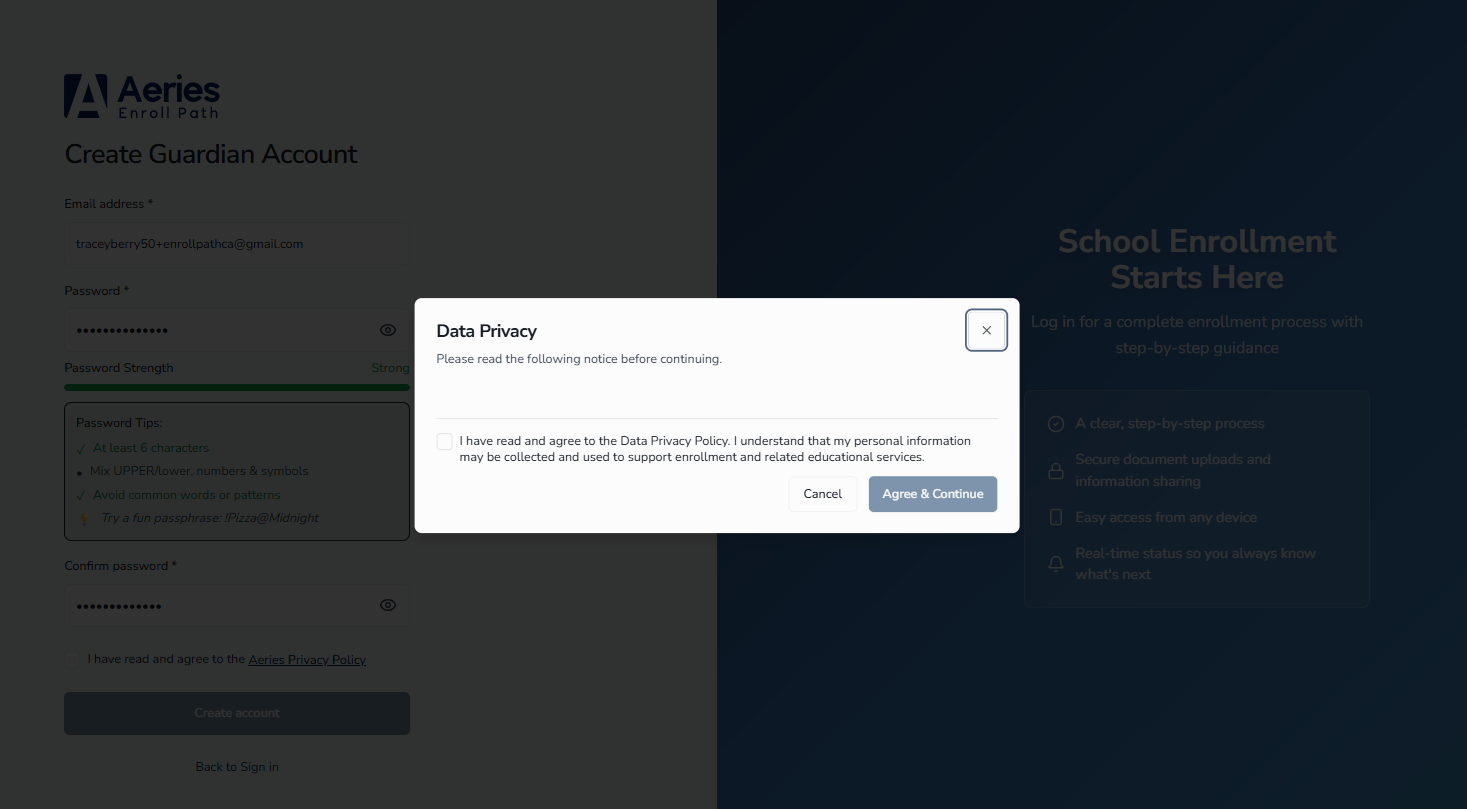
Guardian Account Consent
The Guardian Account Consent sub-tab controls the data privacy notice that parents see during account signup, before they begin an enrollment. Use it to present your district's privacy commitments and capture explicit consent to data collection at account creation.
The editor section heading reads Data Privacy. When custom content has been saved, the description line includes the indicator (Custom content active); otherwise the default district-wide content is in effect.

Data Privacy Fields
| Field | Description | Required |
|---|---|---|
| Title | Headline shown at the top of the signup consent screen (maximum 200 characters) | Yes |
| Description | Brief sub-line beneath the title | No |
| Body Content | Full-text notice. Edited in the same rich-text editor used elsewhere in the application, with support for formatting, lists, links, images, blockquotes, and a formatted-box element. | No |
| Privacy Policy URL | Optional link to the district's full privacy policy. Must use http:// or https://. | No |
| URL Label | Display text for the privacy policy link (for example, "Read the full Privacy Policy") | No |
| Checkbox Label | Text shown next to the consent checkbox the parent must check during signup | Yes |
Editing the Data Privacy Notice
To update the Guardian Account Consent notice:
- On the Privacy Settings tab, click the Guardian Account Consent sub-tab.
- Update the Title, Description, Body Content, Privacy Policy URL, URL Label, and Checkbox Label as needed.
- Click Save & Publish.
To reset all fields back to their default values:
- Click the Reset button on the Guardian Account Consent tab.
- Review the confirmation dialog.
- Click Confirm to restore all editable fields to their defaults.
- Click Save & Publish to publish the reset content.
The Save & Publish button stays disabled until you have unsaved changes and all required fields are filled in. To discard your edits before saving, click Cancel.
Previewing the Guardian View
Click Preview in the top-right of the editor to see how the notice will appear to parents during account signup. The preview uses the same layout shown to the parent.
Managing Translations
Click Translations in the top-right of the editor to open the Translations dialog for Guardian Account Consent. The workflow is the same as for Student Enrollment Consent — including the Translate and Preview view modes, the Auto Translate AI workflow with per-field translation, and the per-language Save and trash icon controls. See Managing Translations under Student Enrollment Consent for the full procedure.
Each Guardian Account Consent translation includes its own Title, Description, Body Content, URL Label, and Checkbox Label, and is shown to parents whose preferred language matches. The Privacy Policy URL is not translatable.
Tips for Efficiency ↑
- Complete district information first - Setting up the district before adding schools establishes the contact information and branding inherited by school-specific communications.
- Upload district and school logos - Logos improve the parent-facing presentation and help families identify their schools at a glance. The upload accepts a wide range of formats (JPG, PNG, WEBP, GIF, BMP, SVG, HEIC, AVIF, HEIF, TIFF) up to 5 MB.
- Choose the school view that fits your workflow - Use List view when you have many schools and want a compact table; switch to Grid view when you need to see logos, grade badges, and program counts at a glance. Your choice is remembered for next time.
- Set grade levels precisely - Parents only see schools that serve their student's grade level. Use Add Custom Grade for non-standard categories such as Adult Education or Continuation.
- Test boundaries with real addresses - Before announcing a new boundary, paste a few representative addresses into the Boundary Test Tool to confirm they resolve to the expected school.
- Preview privacy notices before publishing - Always click Preview on the Student Enrollment Consent editor before saving, especially after rich-text edits.