

The Documents page enables administrators to upload, organize, preview, and control document visibility for enrollment forms. This page is designed for district administrators who manage documents that parents/guardians must review or sign during enrollment, including policies, handbooks, required forms, and acknowledgments.
From this page, you can:
- Upload and manage PDF documents for enrollment forms
- Organize documents into color-coded groups
- Preview documents with interactive form testing
- Add translated versions for multilingual families, including translated document titles
- Sync documents from Aeries SIS and monitor per-document sync status
- Review guardian acknowledgements and signatures in admin review
To access this page, navigate to Enrollment Setup > Documents in the left sidebar.
Table of Contents ↑
Prerequisites
Adding Documents
Document Groups
View Options
Filtering and Searching
Document Actions
Document Preview
Document Acknowledgement
Document Files
Aeries SIS Documents
Editing Documents
Archiving and Deleting
Best Practices
Prerequisites ↑
To access and manage documents, users must have the following:
| Role | Access Level |
|---|---|
| District Administrator | Full access to upload, edit, and manage all documents |
Adding Documents ↑
To add a new document:
- Click the Add Document button in the top-right corner to open the upload wizard.
- In Step 1: Overview, enter the document details:
- Title (required) - The document name displayed to users (auto-populated from filename if left blank)
- Group - Assign to a document group for organization (select "No group" to leave ungrouped)
- Description - Brief summary of the document's purpose (max 500 characters)
- Click Next to proceed to file attachment.
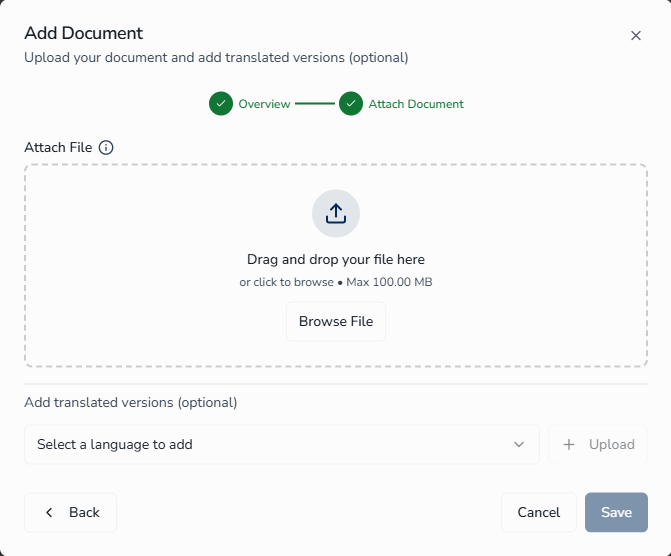
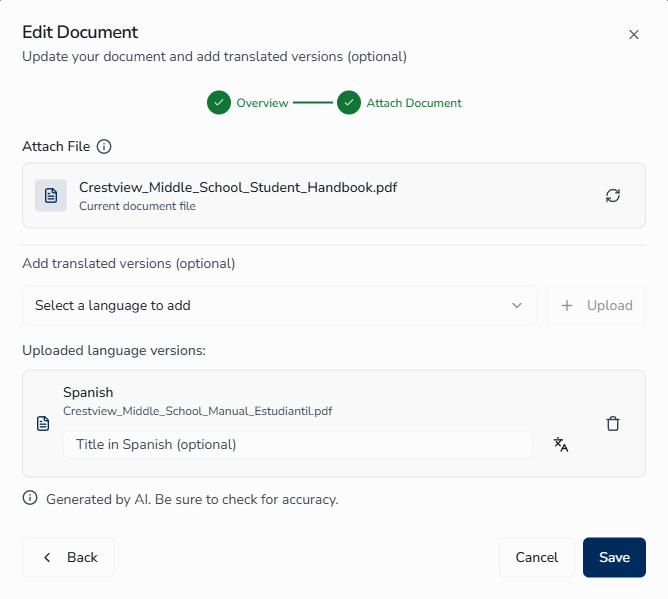
- In Step 2: Attach Document, upload your PDF using drag-and-drop or click Browse File to select from your computer.
- (Optional) Add translated versions by selecting a language from the dropdown, clicking Upload, and uploading the translated PDF. You can also add a translated title for each language version — see Translating Document Titles below.
- Click Save to save the document.
Translating Document Titles
When you add a translated PDF for a language, an inline Title in language name (optional) input appears for that language row. Use it to provide a translated version of the document title so parents and guardians see the title in their preferred language.
To save typing, click the AI translate icon next to the input — this auto-populates the field by translating the English title into the selected language. You can edit the result before saving if needed.
Document Groups ↑
Groups help organize documents into logical categories with visual color-coding. Each group displays the number of non-archived documents it contains in parentheses.
Accessing Group Management
To access group management, click the Groups button in the toolbar (between View Toggle and Add Document).
Creating a New Group
To create a new document group:
- Click Create new group in the Groups popover.
- Configure the group:
- Group Name (required) - Enter a descriptive name (e.g., "Required Forms", "Policies")
- Color (required) - Select from ten predefined colors for visual identification
- Click Save.
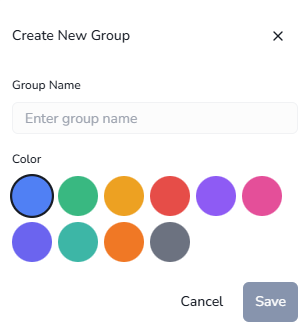
Available Colors
| Color | Hex Code |
|---|---|
| Blue | #3B82F6 |
| Green | #10B981 |
| Yellow | #F59E0B |
| Red | #EF4444 |
| Purple | #8B5CF6 |
| Pink | #EC4899 |
| Indigo | #6366F1 |
| Teal | #14B8A6 |
| Orange | #F97316 |
| Gray | #6B7280 |
Editing a Group
To edit an existing group:
- Hover over the group in the list.
- Click the Pencil icon.
- Modify the group name or color.
- Click Save.
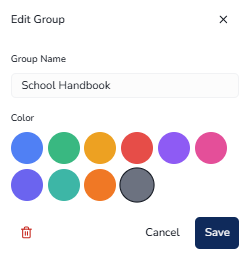
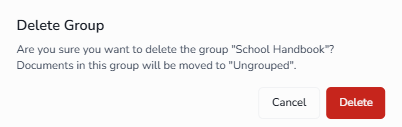
Deleting a Group
To delete a group:
- Enter edit mode for the group in the list.
- Click the Trash icon.
- Confirm deletion in the dialog.
View Options ↑
Toggle between views using the View Toggle buttons in the toolbar.
List View (Table Format)
List view displays documents in a table with the following columns:
| Column | Sortable | Description |
|---|---|---|
| Title | Yes | Document name with description preview (truncated). Search terms are highlighted in yellow. |
| Group | Yes | Dropdown selector showing current group with color dot. Click to reassign. |
| No. of Files | No | Clickable count showing total files (primary + translations). Click to open the Document Files dialog and view file details. |
| Last Updated | Yes | Date of most recent modification |
| Actions | No | Three-dot menu with available actions |
Sorting
Click any sortable column header (Title and Last Updated) to sort. The first click sorts ascending (A→Z, oldest→newest), and the second click sorts descending (Z→A, newest→oldest). An arrow indicator (↑ or ↓) shows the current sort direction.
Pagination
The list displays 10 documents per page. Navigation controls appear when more than 10 documents exist and show the current range (e.g., "1-10 of 45").
Grid View (Card Format)
Documents are organized into collapsible group sections.
Section Header
Each section header displays:
- Expand/collapse chevron icon
- Folder icon (colored for groups, gray for Ungrouped)
- Group name
- Document count badge
- "Drop here" indicator when dragging
Document Cards
Each document card displays:
- Document title
- Description preview
- File count indicator
- Action menu
Drag & Drop
To reorganize documents between groups:
- Grab any document card to drag.
- Drop onto a different group section header.
- Visual feedback shows valid drop targets with "Drop here" text.
Expand/Collapse Controls
Click individual section headers to toggle, or use the Expand All / Collapse All button to affect all sections at once. Empty groups display placeholder text: "Drag documents here to add to this group."

Filtering and Searching ↑
Search Bar
The search bar is located in the top-left of the toolbar. It searches document titles and descriptions, with matching text highlighted in yellow in results. Search is instant (no submit required). Click the X icon to clear the search.
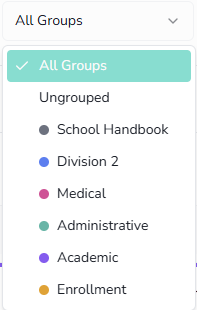
Group Filter Dropdown
Filter documents by group assignment:
- All Groups - Show all documents regardless of group assignment
- Ungrouped - Show only documents without a group assignment
- Group name - Show only documents in the selected group (displays color dot)
Tab Filtering
- All Documents - Shows all documents (excludes Archived)
- Archived - Shows only archived documents
- Aeries SIS Documents - Shows the Aeries portal document catalog with per-document sync status (see Aeries SIS Documents)
Document Actions ↑
Access document actions via the three-dot menu (⋮) on each document row or card.
| Action | Availability | Description |
|---|---|---|
| Preview | All documents | Opens interactive preview dialog |
| Edit | Non-archived only | Opens the edit dialog with all document settings |
| Archive | Non-archived only | Moves document to Archived tab |
| Unarchive | Archived only | Restores document to All Documents tab |
| Delete | Archived only | Permanently removes the document and all files |
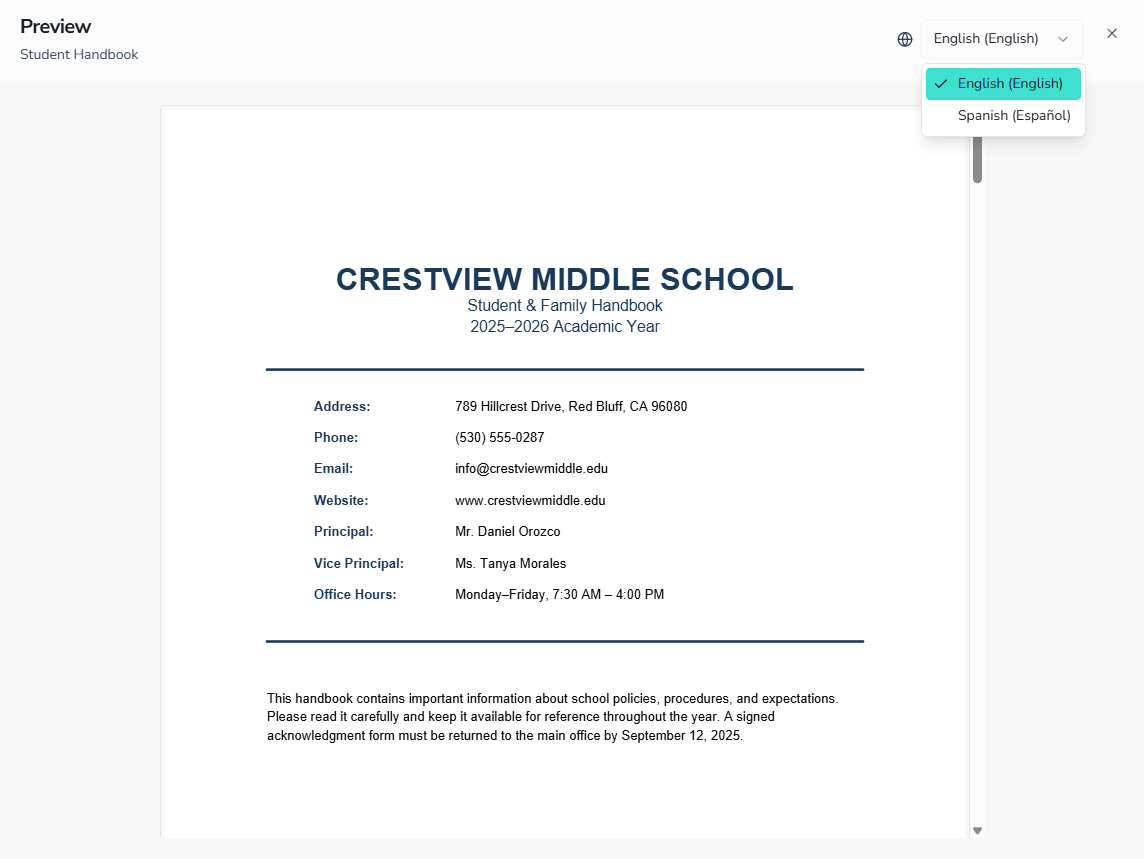
Document Preview ↑
The preview dialog provides an interactive view of how the document appears to end-users.
Header Section
The preview header displays:
- Document title
- Description
- Close button (X)
- Language selector dropdown (if translations exist)
Switching languages loads that version's PDF. The default language is English.
PDF Viewer
The embedded PDF viewer displays the document with standard controls for zooming, paging, and downloading. If the document contains fillable form fields, you can test them in the preview to verify they work correctly.
Document Acknowledgement ↑
Guardians and administrators have a complete, integrated workflow for reviewing, acknowledging, and tracking enrollment documents within Enroll Path.
Guardian Experience
When a guardian reaches a document step in the enrollment form:
- Documents open in an in-app viewer — guardians no longer navigate to a separate browser tab.
- After viewing all required documents, a single I have read and acknowledge checkbox captures the acknowledgement.
- For documents requiring a signature, guardians adopt their signature once and apply it with Click to Sign.
- An Acknowledged on [date] confirmation is displayed immediately after submission.
Administrator View
Administrators can review guardian acknowledgement details from the enrollment record:
- Signature images are visible in admin review.
- Acknowledgement dates are displayed alongside each document.
- A drift advisory appears when a guardian's acknowledged version no longer matches the current version in Aeries SIS, indicating the guardian may need to re-acknowledge an updated document.
Document Files ↑
The Document Files dialog provides a quick way to see and open every file attached to a document — both the primary file and any translated versions — without opening the full Edit dialog.
Opening the Files Dialog
From the List view, click the file count in the No. of Files column on any document row. The dialog opens with the heading Files for followed by the document's title.
What the Dialog Shows
For each attached file, the dialog displays:
- File-type icon - Color-coded by file type (PDF, image, spreadsheet, document, video, audio, or archive)
- Filename - The original uploaded filename
- Language label - The language this file is for; the default language is marked with (Primary)
- Open in new tab button - The external-link icon on the right opens that file in a new browser tab
If a document has no files attached, the dialog shows an empty state: "No files attached."
Aeries SIS Documents ↑
The Aeries SIS Documents tab shows the Aeries portal document catalog and the sync status of each document between Aeries SIS and Enroll Path. Use this tab to import new documents from SIS and keep existing documents up to date.
Sync Status
Each document in the Aeries SIS Documents tab displays a per-document sync status indicating whether the document has been pulled from SIS, pushed to Enroll Path, skipped, or encountered an error during the last sync.
Running a Sync
To sync documents from Aeries SIS:
- Click the Aeries SIS Documents tab.
- Click Sync with SIS.
- The sync runs a pull-then-push operation: documents are first pulled from Aeries SIS, then pushed to Enroll Path.
- When the sync completes, a report displays showing the result for each document: pulled, pushed, skipped, or errored.
Sync Report
The sync report summarizes the outcome of the most recent sync run. For each document, the report shows one of the following statuses:
| Status | Meaning |
|---|---|
| Pulled | Document was retrieved from Aeries SIS |
| Pushed | Document was successfully created or updated in Enroll Path |
| Skipped | Document was unchanged since the last sync and required no update |
| Errored | Document encountered a problem during sync; review the error detail for next steps |


Editing Documents ↑
To edit an existing document:
- Click the action menu (⋮) on the document and select Edit.
- In Step 1: Overview, update the document details as needed:
- Title - Update the display name
- Group - Reassign to a different group or remove from group
- Description - Modify summary text (max 500 characters)
- Click Next to proceed to file management.
- In Step 2: Attach Document, manage files as needed:
- Click Replace to upload a new version of the primary file
- Click Delete (trash icon) on any translation to remove it
- Add new translations using the language dropdown and Upload button
- Edit the translated title for any language version, or use the AI translate icon to auto-fill it from the English title (see Translating Document Titles)
- Click Save to apply your changes.
Archiving and Deleting ↑
Archiving a Document
To archive a document:
- Locate the document in the All Documents tab.
- Click the action menu (⋮) and select Archive.
- The document immediately moves to the Archived tab.
Archived documents are no longer visible to parents. They cannot be edited or downloaded, but can be viewed (Preview), restored (Unarchive), or permanently deleted. Archived documents are also excluded from SIS syncs and do not appear in the sync report.
Restoring a Document
To restore an archived document:
- Go to the Archived tab.
- Click the action menu (⋮) and select Unarchive.
- The document returns to the All Documents tab as Draft status.
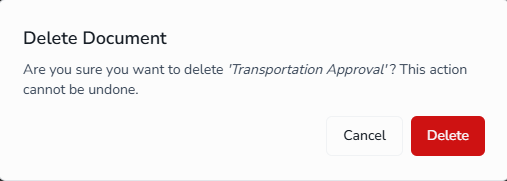
Permanently Deleting a Document
Documents must be archived before they can be deleted.
To permanently delete an archived document:
- Go to the Archived tab.
- Click the action menu (⋮) and select Delete.
- Confirm in the deletion dialog.
- The document and all associated files are permanently removed.
Best Practices ↑
| Goal | Recommendation |
|---|---|
| Organization | Create groups by document type (e.g., "Policies", "Medical Forms", "Handbooks") |
| Findability | Write clear, descriptive titles and add descriptions to help users locate documents |
| Multilingual Support | Upload translations and add translated titles for all configured languages to ensure accessibility |
| Version Control | Archive old versions before replacing to maintain document history |
| Cleanup | Periodically review Archived tab and delete obsolete documents |
| Testing | Always preview documents before publishing to verify form fields work correctly |
| SIS Sync | Run a SIS sync after making changes in Aeries SIS to keep Enroll Path documents current; archive outdated documents before syncing to keep the sync report clean |
| Drift Monitoring | Monitor drift advisories in enrollment records to identify guardians who acknowledged an outdated document version |