

NOTE: Records Transfer is available to California districts only. Texas districts use TREx instead.
Once a records request has been sent TO your district, a user with appropriate permissions can view and manage all incoming records requests. This requires Update permission to the Incoming Record Requests (RTR) security area and Read permission to the Student Data (STU) security area. Select Records Transfer (BETA) | Incoming Requests from the navigation menu. The page lists the incoming requests for the whole district.

The Incoming Requests page has five filter views at the top for viewing the incoming records requests.
Pending – Displays requests that have been received from other districts but have no action taken yet by your district. When a request is first created, the status is Pending. Requests whose records are being sent also show here with a status of Transferring Data and a Sending... indicator until the send finishes.
Sent – Displays requests for which records have been sent by your district to the requesting district
Complete – Displays requests which the requesting district has marked as complete (i.e., the other district has finished importing records into their Aeries database)
Failed Requests – Displays requests that encountered an error sometime after being created. This is most often the result of an improper configuration. Possible causes include an Aeries web instance not running over HTTPS, an incorrectly registered Aeries URL, or an incorrect District Authorization Code. A request also moves to Failed if sending the records does not finish within about 5 minutes, or if the records or a rejection cannot be delivered. The reason is logged in the request's messages. Use Find Matches on a failed request to try again.
Rejected – Displays requests that were rejected by your district. For instance, your district may not have found the student in your Aeries database.
Certain information will display for each request in the selected view.
Student – The student name, state ID number, and birth date per the district that sent the request
Requested – The date and time the request was submitted
Status – The status of the request and the date and time the status was last updated
District – The district from which the request was sent
School – The school from which the request was sent
City – The city where the school is located
School Contact – The name and phone number of the designated contact at the school from which the request was sent. Click the contact name to open your email client to send an email to the contact.
Find Student
On the Pending and Failed Requests views, each request has a Find Matches button to the left. Click this button to search for the student in your Aeries database.

The Student Matches window will display, listing possible student matches with the best match candidates at the top of the list. The fields that match between your Aeries data and the requesting district’s Aeries data are highlighted with a colored underline. Click anywhere on a row to select that student record.
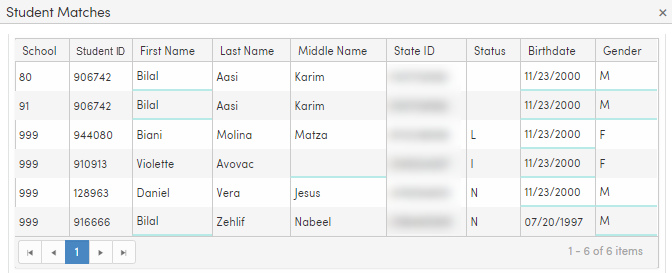
If there are many possible matches, the list will be paginated, and page navigation will be at the bottom of the list.
If none of the possible matches are correct, click the Student Not Found button below the list.
When the button is clicked, the following confirmation message will display. Click OK to mark the records request as Rejected. This will also send a notification to the requesting district. Click Cancel to return to the list of possible matches.

Release Records
After a matching record is selected, the following form will display, listing tables with records available to be sent to the requesting district. Only Testing Data (TST), Content Standards Scores (CST), College Tests (CTS) and Transcripts (HIS) can be sent. Enrollment, Immunizations, Language Assessment and Physical Fitness are listed with their record counts but are always disabled, and a table with no records is disabled. Testing Data and Content Standards Scores include California state tests only (such as ELPAC, SBAC, CELDT and CST); local tests are not sent.
If a school on the student's transcript is missing a CDS code in your Course History Institutions, a warning displays under Transcripts and the records cannot be released until the CDS code is added on the Course History Institutions page or Transcripts is unchecked.
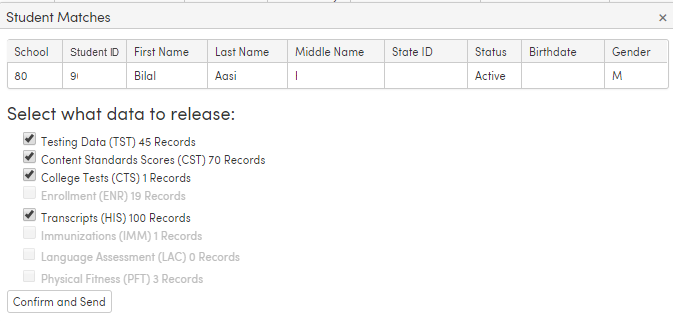
Check the box next to each table whose records you wish to send to the requesting district. Then, click the Confirm and Send button. This will send the selected data to the requesting district for their review. The records are sent in the background: the request shows as Transferring Data in the Pending view, then changes to Sent (or Failed if the send did not go through). The requesting district's request changes to Data Received. For the incoming request, this is the final step.

Special Permission – Release Records from All Schools
If a user does not have permission to login to all Aeries schools in the district, that user can still be given the ability to release records from all schools in the district via the Records Transfer process. On the Permissions form, under the Records Transfer heading, there is a security area named Release Records from All Schools. If a user has Read permission to this security area, the user can release records for a student at any school in the district. Without it, a user can only release records for a student enrolled at the school they are currently logged into (not from the district office); otherwise a message explains that personnel at the student's school must release the records, and Confirm and Send is unavailable.

Messages
Each request has a message thread with the other district. Click the speech-bubble icon on a request to view the messages, type in the message box and click Send. The icon turns red when there are unread messages. Status changes are also logged in the thread automatically.