

The Users page lets administrators invite new admin and enrollment users, manage their access, and review the read-only role permission matrix. Use it whenever staff join, change responsibilities, or leave the district.
From this page, you can:
- Invite a new user by email and assign a role
- Search, filter, and sort the list of users in your district
- Activate, deactivate, archive, restore a user
- Resend an invitation that has expired or been missed
- Review which permissions belong to each role (read-only)
To access this page, navigate to Admin Portal > Administration > Users in the left sidebar.
Table of Contents ↑
Prerequisites
All Users Tab
Adding New Users
User Actions
User Statuses
User Roles
Role Permissions Tab
Frequently Asked Questions
Prerequisites ↑
To open and use the Users page, you must have the Admin role assigned to your account. Users with the Enrollment role do not see the Administration group in the sidebar and cannot access this page.
All Users Tab ↑
The All Users tab lists every admin and enrollment user account in your district.
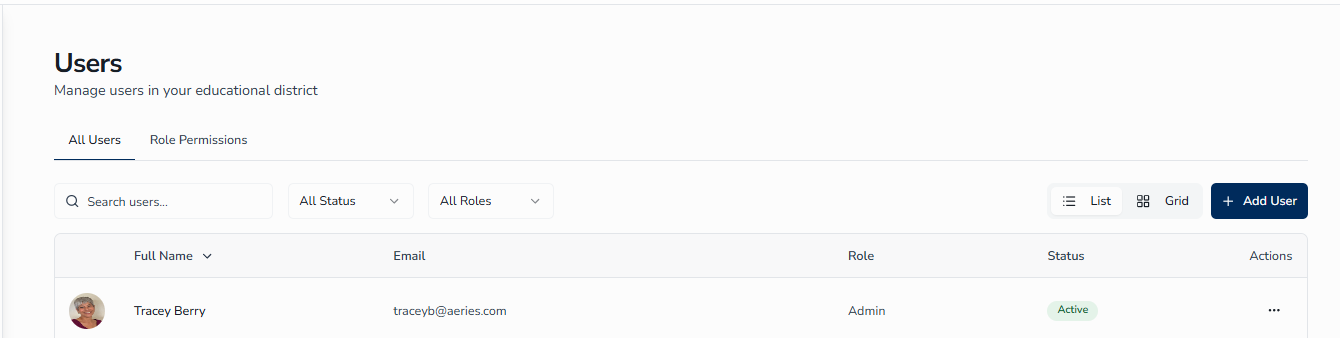
List Columns
By default, the list shows 10 users per page in a table with these columns:
- Avatar — Profile picture or initials
- Full Name — The user's first and last name
- Email — The user's email address
- Role — Admin or Enrollment
- Status — Active, Inactive, or Archived
- Actions — A three-dot menu for managing the user (hidden for your own row)
Search
The search bar at the top of the page filters the list as you type. It matches against full name, display name, email, role, and status. Click the X icon to clear the search.
Status Filter
Click the Status dropdown to narrow the list:
- All Status — every user regardless of status
- Active — only active users
- Inactive — only deactivated users
- Archived — only archived users
Role Filter
Click the Role dropdown to narrow by role:
- All Roles — both admin and enrollment users
- Admin — only users with the Admin role
- Enrollment — only users with the Enrollment role
Switching Views
Use the List / Grid toggle next to the Add User button to switch layouts. List view shows a sortable table; Grid view shows users as cards.
Sorting
In list view, click any column header — Full Name, Email, Role, or Status — to sort. The first click sorts ascending; the second click sorts descending. A chevron indicator (↑ or ↓) shows the current sort direction.
Adding New Users ↑
To invite a new user:
- Click the Add User button in the top-right of the All Users tab.
- In the Add User dialog, enter the new user's Email Address.
- Under Role, select Admin or Enrollment. Enrollment is selected by default. See User Roles below for what each role can do.
- Click Send Invitation. (To close the dialog without sending, click Cancel.)

The invited user receives an email with a link to accept the invitation and create their account. Once they accept, they appear in your Users list with the assigned role and an Active status.
User Actions ↑
Open the three-dot menu (⋮) on any user's row or card to see the actions available for that user. Available actions depend on the user's current status. The menu does not appear on your own row, so you cannot deactivate, archive your own account.
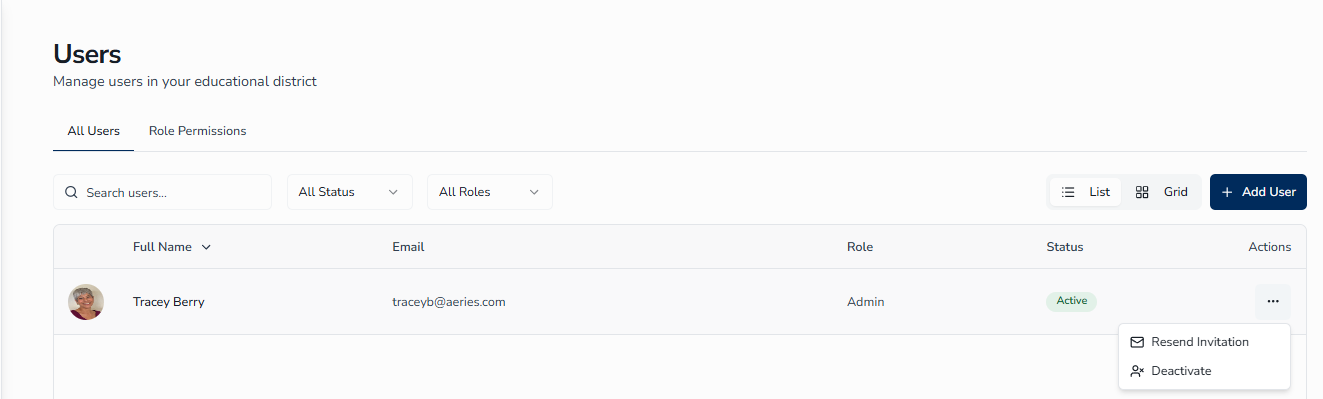
For Active Users
| Action | Description |
|---|---|
| Resend Invitation | Sends a new invitation email to the user's address. Useful when the original invitation expired or was missed. |
| Deactivate | Temporarily disables the user's access. They cannot sign in, but their data is preserved and they can be activated again later. |
For Inactive Users
| Action | Description |
|---|---|
| Activate | Restores the user's access; they can sign in again. |
| Archive | Moves the user to Archived status. Use for staff who have left the organization. |
For Archived Users
| Action | Description |
|---|---|
| Restore | Returns the user to Active status. |
User Statuses ↑
Each user has one of three statuses, shown as a colored badge in the Status column:
| Status | Badge Color | Description |
|---|---|---|
| Active | Green | User has full access and can sign in to the system. |
| Inactive | Orange | User access is temporarily suspended; data is preserved and can be reactivated. |
| Archived | Red | User is no longer active; typically used for former staff. Archived users can be restored. |
Status Lifecycle
A user moves through the statuses like this:
New invitation → Active → Inactive → Archived
Inactive and Archived users can be returned to Active at any time.
User Roles ↑
The system supports two roles. Both are system-defined; you cannot create custom roles.
| Role | Description |
|---|---|
| Admin | Full access to all features including Enrollment Management, Forms, Documents, and SIS Integrations. |
| Enrollment | Limited access focused on enrollment management. This role has permission only to review, approve, and manage enrollments (the Edit Enrollments permission). |
Role Permissions Tab ↑
The Role Permissions tab shows a read-only matrix of every permission in the system and which role has it. Use this tab when you want to confirm what a role can do before inviting a new user, or when troubleshooting access for an existing one.
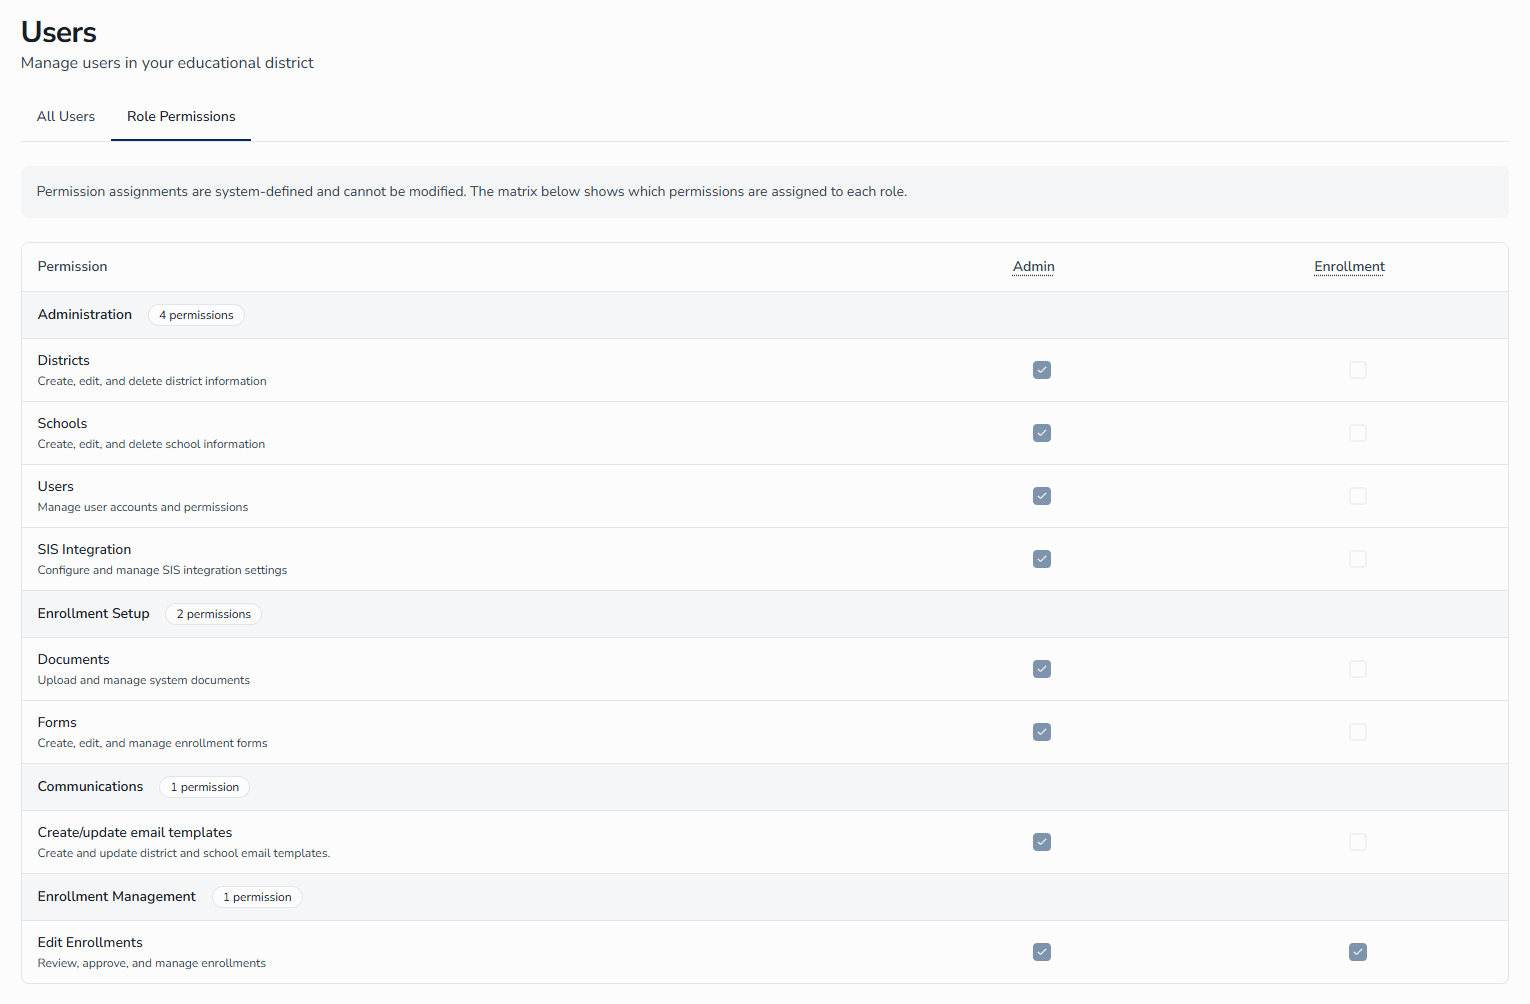
Reading the Matrix
- Rows — Individual permissions, grouped by category.
- Columns — The two roles, Admin and Enrollment.
- Checkboxes — A checked, disabled box indicates the role has that permission.
Admin has all permissions enabled; Enrollment has only Edit Enrollments.
All Permissions
| Permission | Category | Description |
|---|---|---|
| Administration | ||
| Districts | Administration | Create, edit, and delete district information. |
| Schools | Administration | Create, edit, and delete school information. |
| Users | Administration | Manage user accounts and permissions. |
| SIS Integration | Administration | Configure and manage SIS integration settings. |
| Enrollment Setup | ||
| Documents | Enrollment Setup | Upload and manage system documents. |
| Forms | Enrollment Setup | Create, edit, and manage enrollment forms. |
| Communications | ||
| Create/update email templates | Communications | Create and update district and school email templates. |
| Enrollment Management | ||
| Edit Enrollments | Enrollment Management | Review, approve, and manage enrollments. |
Frequently Asked Questions ↑
How do I reset a user's password?
Users reset their own password from the sign-in page using the Forgot password? link. Administrators cannot directly reset another user's password.
Can I change a user's role after they accept the invitation?
Role assignment happens at invitation time. To change an existing user's role, archive their account and send a new invitation with the desired role.
What happens when I deactivate a user?
Deactivated users cannot sign in, but their data and history are preserved. Deactivation is reversible — use Activate to restore access.
Can I invite multiple users at once?
Each invitation goes to a single email address with a single role assignment. To onboard multiple staff, send invitations one at a time.
What if a user does not accept their invitation in time?
If an invitation expires before it is accepted, open the user's row in the All Users tab, click the three-dot menu (⋮), and select Resend Invitation to send a fresh invitation email.
Why does my own row not have an Actions menu?
The Actions menu is hidden on your own row to prevent self-deactivation, self-archive. To make changes to your own profile, use My Profile from the user menu in the header.
Why can't I modify role permissions?
Permissions are system-defined to ensure consistent and secure access across districts. The Role Permissions tab is read-only by design — it documents which permissions belong to each role rather than letting you change them.