

The Enrollment Management page is your central hub for reviewing, processing, and managing student enrollments. This page is designed for district administrators and enrollment specialists who process enrollment applications.
From this page, you can:
- Search, filter, and sort enrollments by status, school, grade, tags, and more
- Review enrollment details and update statuses
- Import enrolled students directly into Aeries SIS
- Edit enrollment fields as needed
- Manage tags for workflow organization
- Perform bulk actions on multiple enrollments
- Export data and print enrollment records
- Archive and restore enrollments
The Enrollment Management page is the default landing page after login. To access it at any time, click Enrollment Management in the left sidebar.

Table of Contents ↑
Prerequisites
Dashboard Overview
Filtering and Searching
Survey Visibility
Working with Individual Enrollments
Enrolling and Importing to Aeries SIS
Change Log
Managing Tags
Bulk Actions
Exporting Data
Archived Enrollments
Tips for Efficiency
Prerequisites ↑
The following permissions are required to access the Enrollment Management page:
| Role | Access Level |
|---|---|
| Administrator | Full access to view, edit, and manage all enrollment records |
| Enrollment Specialist | Full access to view, edit, and manage all enrollment records |
Dashboard Overview ↑
Statistics Cards
At the top of the Enrollment Management page, five clickable statistics cards summarize enrollment statuses:
- Total Enrollments - All enrollment records in the system
- In Progress - Form started by guardian but not yet submitted
- Submitted - Form submitted by guardian, awaiting review by school staff
- Action Required - Enrollment pushed back to guardian for updates; guardian receives an email and notification in the Guardian Portal
- Enrolled - Staff has officially enrolled the student

Filtering and Searching ↑
Search
Use the search bar on the Enrollment Management page to find enrollments by:
- Enrollment ID
- Student name
- Guardian name
- Schools (Preferred School, Secondary Choice, or School of Residence)
- Form Title
- Status
- Grade
- Submitted Date
- Date of Birth
Filters
Use the filter options to narrow your enrollment list:
- Preferred School - Filter by all available school names
- Grade - Filter by all available grade levels
- Status - Filter by In Progress, Submitted, Enrolled, Action Required
- School - Filter by all available schools
- School Year - Filter by enrollment year
- Form Title - Filter by the form used
- Tags - Filter by assigned organizational tags
- Duplicates - Show only potential duplicate enrollments
- Submitted Date - Filter by a date range of when enrollments were submitted. Enter a From and To date to display only enrollments submitted within that period. Clear the filter to restore the full list.

Column Visibility
The Column Visibility feature allows you to customize which columns are displayed in the applications table, helping you focus on the information most relevant to your workflow.
Accessing Column Settings
To access column visibility settings:
- Locate the Settings icon (gear/cog wheel) in the toolbar next to the Filter button.
- Click the icon to open the Column Visibility dropdown.
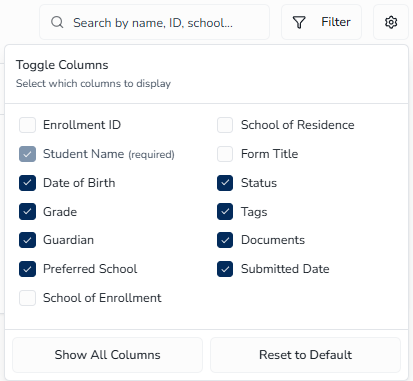
Available Columns
| Column | Default Visibility | Can Be Hidden |
|---|---|---|
| Indicator (duplicate warning and SIS match) | Visible (Required) | No (Required) |
| Enrollment ID | Hidden | Yes |
| Student Name | Visible | No (Required) |
| Date of Birth | Visible | Yes |
| Grade | Visible | Yes |
| Guardian | Visible | Yes |
| Guardian Email | Hidden | Yes |
| Primary Phone Number | Hidden | Yes |
| Preferred School | Visible | Yes |
| School of Enrollment | Hidden | Yes |
| School of Residence | Hidden | Yes |
| Form Title | Hidden | Yes |
| Status | Visible | Yes |
| Tags | Visible | Yes |
| Documents | Visible | Yes |
| Surveys | Hidden | Yes |
| Submitted Date | Visible | Yes |
Required Columns
The Duplicate Warning Indicator and Student Name columns are always visible and cannot be hidden.
Managing Columns
To manage column visibility:
- Click the Settings icon to open the Column Visibility dropdown.
- Toggle individual columns by clicking the checkbox next to any column name to show or hide it.
- To display every available column, click the Show all Columns button at the bottom of the dropdown.
- To restore default column visibility and column widths, click Reset to Default.
Persistence
Your column visibility and column order preferences are saved automatically in your browser and will be preserved between sessions.
Column Resizing
The enrollment table supports column resizing, allowing you to adjust column widths to better fit your content.
How to Resize Columns
To resize a column:
- Hover over the right edge of any column header until your cursor changes to a resize cursor (double-headed arrow).
- Click and drag left or right to adjust the column width.
- Release the mouse button when you've reached your desired width.
Resize Behavior
- Each column has a minimum width to ensure content remains readable.
- The resize handle appears as a subtle vertical line on the right edge of column headers.
- While resizing, the handle is highlighted for visibility.
- Sticky columns (like the Actions column) cannot be resized.
Persistence
Your column width preferences are automatically saved to your browser and will be preserved between sessions.
Resetting Column Widths
To restore all columns to their default widths:
- Click the Settings icon (gear/cog wheel) in the toolbar.
- Click Reset to Default.
This action restores both the default column visibility and the default column widths.
Duplicate Detection
Enrollment records are automatically flagged as potential duplicates when multiple submissions share all three of the following:
- First Name
- Last Name
- Date of Birth
To identify duplicates, look for the orange Duplicate badge on application rows. Use the Duplicates filter to show only potential duplicate enrollments for review.

Pagination
The enrollment list displays 10 records per page. When more than 10 enrollments exist, navigation controls appear at the bottom of the table showing the current range (e.g., "1-10 of 149"). Use the forward and backward arrows to move between pages.

Survey Visibility ↑
Survey Visibility lets staff see, at a glance, which program surveys a student has completed — both on the enrollment list and on the review screen. It covers three surveys: Residency, Military, and Foster.
Surveys Column
A Surveys column can be added to the enrollment list. It is hidden by default — turn it on from the Column Visibility (gear) menu, the same way you show any other optional column. Once enabled, the column displays completion icons indicating which of the three surveys the student completed.
Surveys Filter
A Surveys filter is available in the filter panel. It lets you narrow the list to enrollments that completed a specific survey. The filter offers three options:
- Residency Survey
- Military Survey
- Foster Survey
Selecting a survey hides the rows that do not include it. The Surveys filter counts toward the active-filter badge and is cleared by Clear All Filters.
Surveys in the Student Overview Panel
When you open an enrollment for review, the Student Overview panel includes a Surveys row with the same three surveys (Residency, Military, Foster). An icon appears for a survey only when the guardian gave an affirmative response — so the icons highlight the students who indicated a residency, military, or foster situation that may need follow-up.
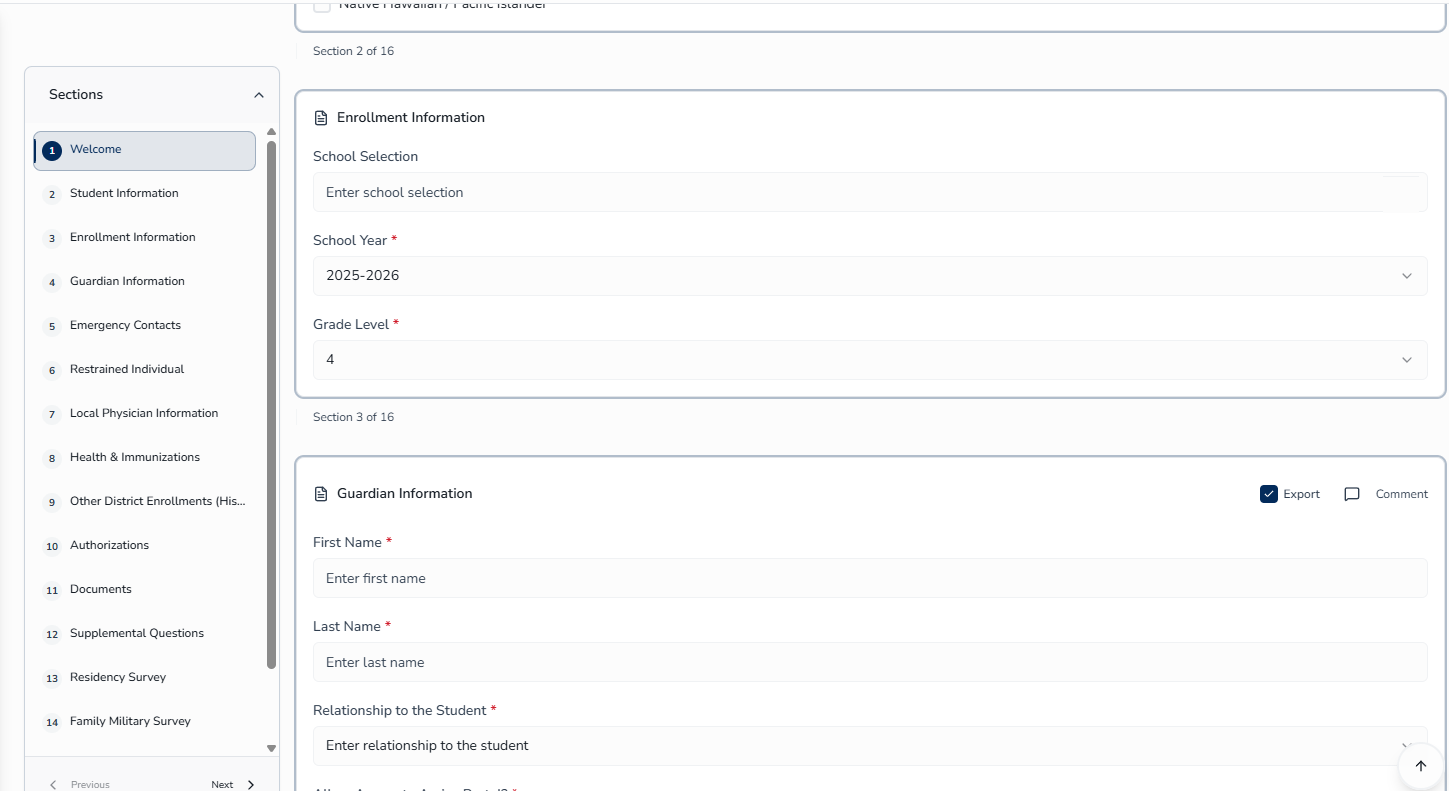
Working with Individual Enrollments ↑
Viewing Enrollment Details
To view complete enrollment information:
- From the Enrollment Management table, locate the enrollment record.
- Click the Review button to open the Enrollment Detail modal.
- Review the available tabs:
- Details - Complete enrollment information
- Internal Notes - Internal notes and communication
- Change Log - Tracks what changed, when, and by whom
Navigating Between Enrollment Records
To move between enrollment records from within the details modal:
- Open the Enrollment Detail modal by clicking Review.
- Locate the navigation arrows in the dialog header (left arrow and right arrow icons).
- Click the left arrow to move to the previous enrollment record in your filtered list.
- Click the right arrow to move to the next enrollment record in your filtered list.
Buttons are disabled when you're at the first or last record in the list. These navigation controls allow you to review enrollment records sequentially without closing the modal.
Viewing Submitted Documents
When a guardian uploads documents as part of their enrollment submission, those documents are accessible directly from the enrollment review screen.
To view submitted documents:
- Click the Review button to open the Enrollment Detail modal.
- Locate the Documents section within the Details tab.
- Uploaded documents appear as a document icon with the filename.
- Click the document icon to open or download the file in a new tab.
Changing Enrollment Status
To change the status of an enrollment:
- Click the Review button to open the Enrollment Detail modal.
- Select a status option: In Progress, Submitted, Enrolled, or Action Required.
- Provide a comment if required (only for Action Required status).
- Click Confirm.
Comparing Duplicate Records
When potential duplicates are detected in the system, a Compare Records button appears in the Enrollment Detail modal. This button allows you to review and compare enrollments that may be duplicates based on matching criteria. See Duplicate Detection above for the criteria used to flag potential duplicates.
To compare potential duplicate enrollments:
- Click the Review button on an enrollment marked with the duplicate indicator (orange Duplicate badge).
- In the Enrollment Detail modal, locate the orange Compare Records button in the header area.
- Click the Compare Records button to open the comparison view.
- Review the side-by-side details of the duplicate enrollments to verify if they represent the same student.
- Determine the appropriate action:
- If they are the same student, use the comparison to decide which enrollment to keep and which to archive or delete.
- If they are different students with coincidentally matching names and birth dates, you can close the comparison and proceed normally with processing the enrollment.
Editing Enrollment Fields
Admins and Enrollment Specialists can edit all fields in an enrollment record except Signature fields.
To edit enrollment fields:
- Click the Review button to open the Enrollment Detail modal.
- Click the Edit button.
- Make your changes to the enrollment fields.
- Click Save Changes to save your edits, or click Override if required fields are missing or incomplete.
To discard your changes, click Cancel or the X at the top of the modal.
Override Button
When editing an enrollment with incomplete or missing required fields, you have the option to save using the Override button. This amber-colored button appears in the modal header next to the Save Changes button when you are in edit mode.
The Override button allows you to:
- Save the enrollment even if required fields are empty
- Bypass validation checks for that save
- Mark the enrollment with a timestamp of when the override was applied
All overrides are tracked in the Change Log, so you can review who overrode validation and when.
Jump to Top
When editing a long enrollment form, use the up arrow in the bottom-right corner to jump to the top of the page. This helps you quickly access the Save Changes or Override buttons in the header without scrolling.
Enrolling and Importing to Aeries SIS ↑
Setting an enrollment status to Enrolled triggers a full import of the student's data into Aeries SIS. Before the import runs, the system may require you to resolve a potential SIS match.
SIS Match Indicator
When the system detects a potential matching student record in Aeries SIS, a person icon appears in the Indicator column on that enrollment row. While the indicator is present, the Enroll button is disabled. You must resolve the match before you can proceed.

Resolving a Potential SIS Match
To resolve a potential SIS match:
- Click Review to open the Enrollment Detail modal.
- Click the Link Student Record button in the review toolbar.
- In the District-Wide Student Search dialog, search for the student by last name, first name, date of birth, or student ID. Fields are pre-filled from the enrollment submission.
- If no match is found, a warning banner confirms that the system will create a new student record in Aeries SIS.
- Click Link Student to associate the SIS record.
- In the Verify Existing SIS Recordmodal, review the side-by-side comparison:
- Left side — current Aeries SIS record (read-only)
- Right side — guardian-submitted enrollment data (editable)
- Rows where the two sides differ are highlighted.
- Edit the right side as needed, then select one of the following:
- Mark as New Student — creates a fresh Aeries SIS record instead of updating the matched one.
- Mark as Resolved — confirms the match and enables the Enroll button.


Duplicate Submission Check
Before the import runs, the system checks for other Enroll Path submissions with the same student name and date of birth in the same school year. If a duplicate is found, a dialog presents both records side by side and asks you to select which record to keep before enrollment can proceed.
After Enrollment is Confirmed
Once enrollment is finalized:
- All guardian-submitted data is imported into Aeries SIS — student demographics, contacts, medical history, immunizations, authorizations, survey responses, documents, and more.
- The guardian receives a Parent Portal welcome email with an activation link.
- The enrollment record is locked — the Enroll button and Unlink Student Record option are no longer available.
SIS Import Status and Failures
After you enroll a student, the import can end in one of several states, shown as a badge on the enrollment row:
| Status | Meaning |
|---|---|
| Synced | The student and all related data imported into Aeries SIS successfully. |
| Partial | The main student import succeeded, but one or more related steps did not complete. The record needs reconciliation. |
| SIS Failed | The import failed. The system retries automatically — immediately after failure, then at 5 minutes, then at 30 minutes. |
| Permanently Failed | All automatic retries were exhausted. The import must be re-triggered manually. |
Change Log ↑
The Change Log provides a complete audit trail of all modifications made to an enrollment record. Every tracked action records the user who made the change, the timestamp, and the specific details of what was modified.
Accessing the Change Log
To view the Change Log for an enrollment:
- Click the Review button to open the Enrollment Details modal.
- Click the Change Log tab.
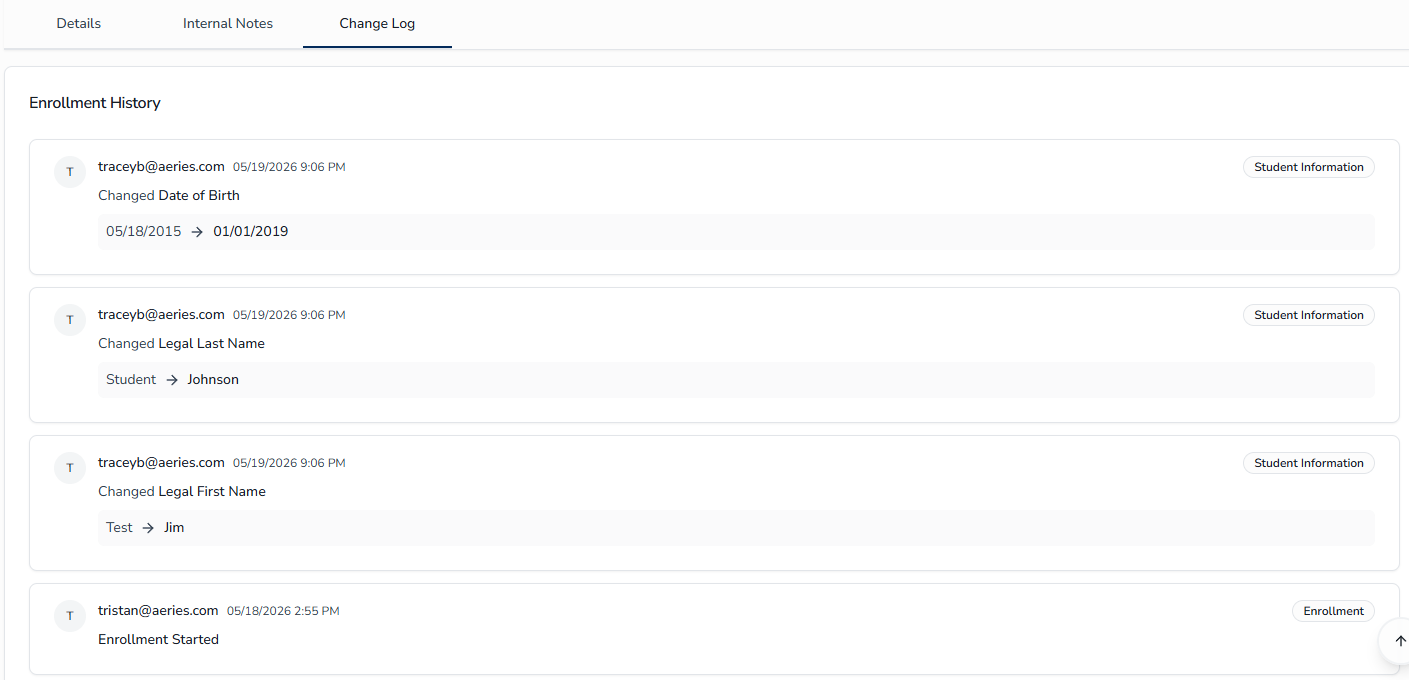
Tracked Actions
The following actions are automatically recorded in the Change Log:
| Action | Details Recorded |
|---|---|
| Status Change | Previous status, new status, and any comments added |
| Field Edit | Field name, previous value, and new value |
| Tag Added | Tag name added to the enrollment |
| Tag Removed | Tag name removed from the enrollment |
| Note Added | Comment text added to Internal Notes |
| Archive | Enrollment moved to Archived status |
| Unarchive | Enrollment restored from Archived status |
| SIS Import | Student record imported to Aeries SIS; import timestamp and student ID recorded |
| SIS Import Failed | Import attempt failed; error details and retry count recorded |
| SIS Student Linked | Enrollment linked to an existing Aeries SIS student record |
| SIS Student Unlinked | A previously linked Aeries SIS record association was removed |
Managing Tags ↑
Tags help categorize enrollments for quicker filtering and workflow tracking.
Tag Categories
| Category | Description | Can Edit/Delete |
|---|---|---|
| Custom | Tags you create for your district's workflow | Yes |
| Priority | Default tags for flagging urgency | No (read-only) |
| Issues | Default tags for tracking problems | No (read-only) |
| Process | Default tags for workflow stages | No (read-only) |
| Status | Default tags for enrollment states | No (read-only) |
Adding Tags to a Single Enrollment
From Enrollment Details Modal
To add a tag from the Enrollment Details modal:
- Click the Review button to open the Enrollment Details modal.
- Click the tag icon button in the header. (Hover over the icon to see the Add Tag tooltip.)
- Choose an existing tag from the picker or create a new Custom tag.
From the Table Row
To add a tag from the table row:
- Select an enrollment record.
- Click the Add Tags button or tag icon.
- Choose an existing tag or create a new one.
Creating a New Tag
You can create new Custom tags at any time. New tags become available system-wide immediately after they are created.
Method 1: Create a Tag While Adding It to an Enrollment
To create a tag while adding it to an enrollment:
- Click Review to open the Enrollment Detail modal.
- Click the tag icon button in the header.
- In the dropdown that appears, scroll to the bottom.
- Click Create New Tag.
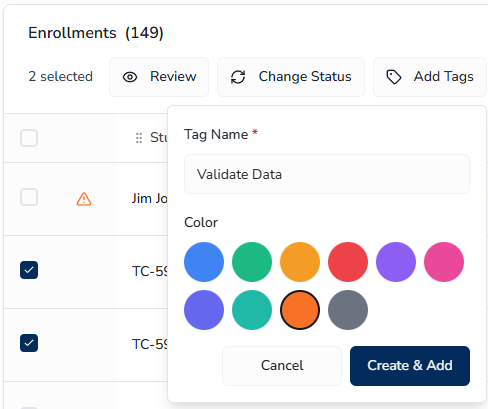
- Complete the form:
- Tag Name (required)
- Color
- Click Create & Add.
This will add the new tag to the enrollment record that is open within the Enrollment Detail modal.
Method 2: Create a Tag During Bulk Actions
To create a tag during bulk actions:
- Select an enrollment record or multiple enrollment records.
- Click the Add Tags button or tag icon.
- In the dropdown that appears, scroll to the bottom.
- Click Create New Tag.
- Complete the form:
- Tag Name (required)
- Color
- Click Create & Add.
This will add the new tag created to all enrollment records selected.
Removing Tags from an Enrollment
You can remove a tag from an individual enrollment record. This does not delete the tag from the system — it only removes the tag assignment from that specific enrollment.
To remove a tag from an enrollment:
- Locate the enrollment record in the table or open the Details Modal.
- Hover over the tag you want to remove.
- Click the X on the tag.
Editing Tags
Only Custom tags can be edited. Default tags (Priority, Issues, Process, Status) are read-only.
To edit a Custom tag:
- Click the tag icon button (from the Enrollment Details modal or Bulk Actions toolbar).
- In the dropdown, locate the Custom tag you want to edit.
- Click the Pencil icon next to the tag.
- Update the tag name or color as needed.
- Click Save.
Deleting Tags
Only Custom tags can be deleted. Default tags cannot be removed.
To delete a Custom tag:
- Click the tag icon button (from the Enrollment Details modal or Bulk Actions toolbar).
- In the dropdown, locate the Custom tag you want to delete.
- Click the Trash Can icon next to the tag.
- Review the confirmation message.
- Click Delete to permanently remove the tag.
Bulk Adding Tags
To add tags to multiple enrollments at once:
- Select the enrollment records you want to tag.
- Click Add Tags in the Bulk Actions toolbar.
- Select the tags you want to apply.
Bulk Actions ↑
Select a single enrollment record or multiple enrollment records to access bulk actions.
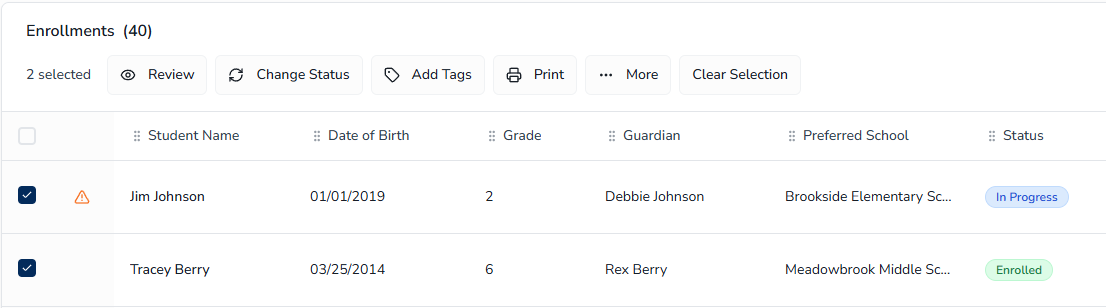
Change Status
To change the status of multiple enrollments:
- Select the enrollment records.
- Click Change Status.
- Select a status.
- Add a note if required.
- Click Confirm.
Add Tags
Select the enrollment records you want to tag, then click Add Tags in the Bulk Actions toolbar and select the tags to apply. See Bulk Adding Tags under Managing Tags for the full procedure.
Select the enrollment records and click Print in the Bulk Actions toolbar, then choose Print Summary or Print Full Application. See Printing Multiple Enrollments under Exporting Data for the full procedure.
Export
Select the enrollment records, click More > Export to CSV, then choose Export with Full Data or Export with Masked PII. See Export to CSV under Exporting Data for the full procedure.
Archive
To archive multiple enrollments:
- Select the enrollment records.
- Click More > Archive.
- Click Confirm.
Exporting Data ↑
Export to CSV
To export enrollment data to CSV:
- Select the enrollment record or multiple enrollment records you want to export.
- Click More.
- Click Export to CSV.
- Select an export option:
- Export with Full Data - Includes all PII (names, emails, addresses)
- Export with Masked PII - Names, emails, and addresses are masked
The CSV export includes all fields from each student's enrollment form.
Print Enrollments
You can print enrollment records individually or in bulk.
Printing Multiple Enrollments
To print multiple enrollments:
- Select the enrollment records you want to print.
- Click Print in the Bulk Actions toolbar.
- Select a print option:
- Print Summary - Condensed overview of key enrollment fields
- Print Full Application - Complete enrollment form with all responses
- Click Print.

Printing a Single Enrollment
To print a single enrollment:
- Click Review to open the Enrollment Details Modal.
- Click the Print button.
- Select a print option:
- Print Summary - Condensed overview of key enrollment fields
- Print Full Application - Complete enrollment form with all responses
- Click Print.
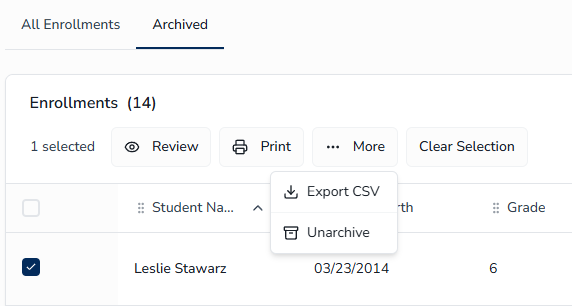
Archived Enrollments ↑
Viewing Archived Enrollments
To view archived enrollments:
- Navigate to the Enrollment Management page.
- Click the Archived tab at the top of the page.
Restoring Archived Enrollments
To restore archived enrollments:
- Click the Archived tab.
- Select the archived enrollment records you want to restore.
- Click Unarchive.
Tips for Efficiency ↑
- Use Statistics Cards - Click cards to quickly filter enrollments by status.
- Batch Process - Use bulk actions to update multiple enrollments at once.
- Use Tags Strategically - Use default tags for common scenarios and create Custom tags for district-specific workflows.
- Filter by Submitted Date - Use the Submitted Date range filter to focus on enrollments received during a specific period.
- Hide Less-Used Columns - Reduce visual clutter and focus on key data by hiding columns you don't need.
- Resize Columns - Adjust column widths to prevent text truncation for fields with longer content.
- Use Show All Temporarily - Click Show all Columns when you need to see complete application details, then reset when done.
- Reset to Default - Quickly return to the standard column view if your layout becomes cluttered.
- Monitor Duplicates - Regularly check for and resolve duplicate enrollments.
- Monitor SIS Import Failures - Check the Issues Widget on the Admin Home page regularly; any red SIS Failed badges on the Enrollment Management list need attention and can be resolved from the SIS Integration page.