

The Admin and Enrollment Specialist Portal is the staff-facing side of Aeries Enroll Path. The Admin role configures the district, builds enrollment forms, manages documents, and oversees user accounts. The Enrollment Specialist role focuses on processing enrollment applications submitted by families — and sees a streamlined portal scoped to that work.
From this portal, depending on your role, you can:
- Sign in with email and password, or via SAML single sign-on (SSO) from your Student Information System (both roles)
- Review and process enrollment applications (both roles)
- Configure forms and documents that families fill out and upload (Admin only)
- Manage district, schools, users, and SIS integration (Admin only)
- Send and schedule communications to families (Admin only)
- Maintain your own profile, avatar, and password (both roles)
To access this portal, open your school's Enroll Path admin login page in a browser using the URL provided by your district.
Table of Contents ↑
Prerequisites
Login Process
Forgot Password
SAML Single Sign-On
Navigating the Admin and Enrollment Specialist Portal
Profile and Account Management
Tips for Efficiency
Prerequisites ↑
Basic Sign-In Prerequisites
Before signing in, ensure your district administrator has set up the following:
- Account and role: An Admin or Enrollment Specialist role must be established for you by your school or district. Your role determines what you see in the portal:
- Admin — full access to forms, documents, communications, district/school configuration, user management, and SIS integration, plus enrollment processing.
- Enrollment Specialist — sees only the Enrollment Management page; cannot create forms, manage documents, or change district configuration.
- Email: A valid email address tied to your account; this is your sign-in identifier and is read-only after creation.
SAML Single Sign-On Prerequisites
If your district uses SAML single sign-on, the following must also be configured:
- SAML integration: The "Enable Aeries to act as a SAML Identity Provider" checkbox must be enabled, and the required certificate configured.
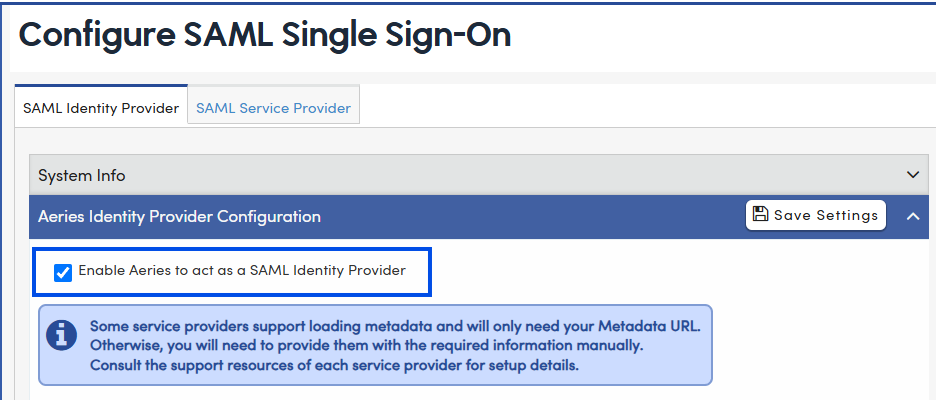
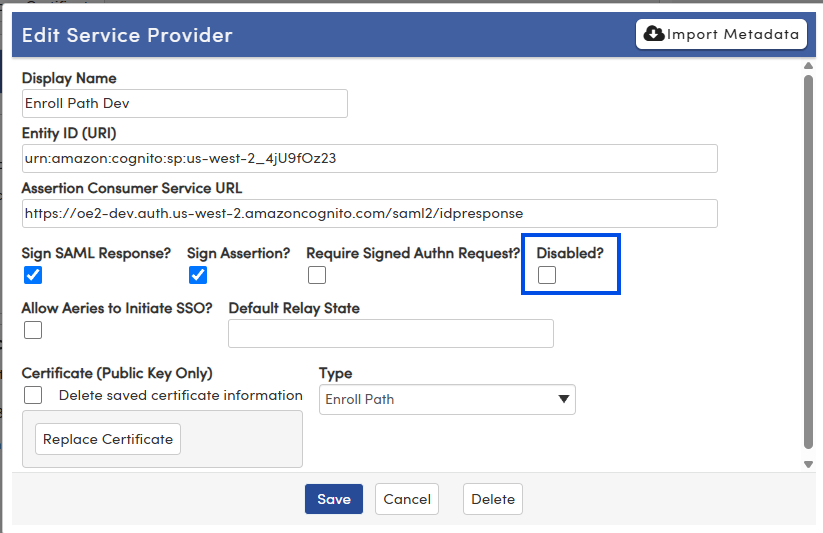
- SAML configuration: When Enroll Path is provisioned for your district, an Enroll Path SAML Service Provider is added to the "SAML Configuration" page. It starts disabled — an admin must enable it before SSO to Enroll Path will work. For the Aeries Enroll Path link to appear in Aeries SIS, your account must also meet two requirements in Aeries SIS, in this order:
- You must have a user account in Aeries SIS (Security > Users) with a valid email address on file.
- Your district administrator must then assign you the Enroll Path - Admin or Enroll Path - Enrollment permission — either by adding your account to a security Group that already has the permission, or by assigning the permission directly to your account on the Permissions tab.
- See Aeries Security - Users for the full account-creation and permission-assignment procedure, and SAML Single Sign-On below for how sign-in works once these are in place.
Login Process ↑
Sign In With Email and Password
- Open your school's Enroll Path admin login page using the URL provided by your district. The page header reads Sign in to your account.
- Enter your Email address. Your email address is not case-sensitive — "Admin@example.com" and "admin@example.com" both sign in to the same account.
- Enter your Password. Click the Show password icon if you want to verify what you typed.
- (Optional) Select Remember me to save your email on the device for future visits. Use this only on a trusted, password-protected work computer; you'll still need to enter your password each time.
- Click Log in.

Set a Password on First Sign-In
First-time users may need to set a password before reaching the portal. Follow the on-screen prompts and choose a password that is at least 8 characters long and combines uppercase letters, lowercase letters, numbers, and symbols.
Where You Land After Signing In
On successful sign-in you are taken to the Enrollment Management page. Your day-to-day work happens on Enrollment Management.
Forgot Password ↑
- On the sign-in page, click Forgot password?.
- On the Reset your password screen, enter your Email address.
- Click Send Reset Link. To return to the login screen without sending, click Back to Sign In.
- Check your email for the password-reset message and follow the link to choose a new password.

SAML Single Sign-On ↑
If your school or district has configured SAML integration with your Student Information System (SIS), you can access the portal via single sign-on without a separate password. The SAML flow recognizes your role automatically and routes you to the right page.
Access from Your SIS
- Sign in to your school's Student Information System.
- In Aeries SIS Classic, locate the Aeries Enroll Path link in the left navigation menu.
- Click the Aeries Enroll Path link. Enroll Path opens in a new browser tab and signs you in automatically — no separate password prompt is needed.
 The Aeries Enroll Path link in the Aeries SIS Classic left navigation menu
Automatic Authentication
You are briefly redirected to your district's identity provider, which displays its provider name on the redirect screen. The system determines your school and authentication settings automatically. If you are already signed in to your district account, no further action is needed; otherwise authenticate with your district credentials.
Role-Based Portal Access
After successful authentication, the system reads your role from the authentication token and routes you accordingly:
- Admin and Enrollment Specialist users are taken to the Enrollment Management page where they can review and process incoming applications.
- You are immediately ready to process enrollment applications.
Navigating the Admin and Enrollment Specialist Portal ↑
The portal has a sidebar navigation on the left, a header on the top, and a main content area in the middle. The sidebar can be collapsed to icons only or expanded to show item labels.
Admin Sidebar
If you sign in with the Admin role, the sidebar contains the following entries, top to bottom:
| Home | Landing page after sign-in. |
| Enrollment Management | Primary interface for reviewing and processing enrollment applications. |
| Enrollment Setup (group) | Expandable group containing Forms and Documents. |
| Communications | Create, update, and schedule email communications to families. |
| Administration (group) | Expandable group containing District & Schools (configure your district and schools), Users (manage admin and enrollment specialist accounts), and SIS Integration (configure your Student Information System integration; visible when enabled for your tenant). |
Enrollment Specialist Sidebar
If you sign in with the Enrollment Specialist role, the sidebar contains a single entry:
- Enrollment Management — review and process enrollment applications submitted by families.
Forms, Documents, Communications, and Administration are admin-only and do not appear for Enrollment Specialists.

Collapsing and Expanding the Sidebar
The sidebar opens by default each time you sign in. On desktop and laptop, click Collapse sidebar at the top of the sidebar to shrink it to icons only, or Expand sidebar to restore full labels. You can also use the keyboard shortcut Cmd+B (Mac) or Ctrl+B (Windows) to toggle the sidebar open or closed from anywhere in the portal. Your preference persists across sessions on the same device.
On mobile and tablet, tap the menu icon in the header to open the sidebar drawer. Tap any item to navigate; the drawer closes automatically. To dismiss without selecting, tap outside the drawer or press the close button.
Header Elements
- Notifications bell — opens recent in-app notifications.
- Theme toggle — cycles through three modes each time you click it: light, dark, and system. Its tooltip shows which mode you'll switch to next (Switch to dark mode, Switch to system mode, or Switch to light mode). The default is system, which follows your device's setting until you choose light or dark explicitly.
- User account menu (avatar in the top-right corner) — opens a menu showing your email, signed-in status, My Profile, Setup Checklist, and Sign out.
Guided Setup Checklist
When you sign in for the first time as a district administrator, a Setup Checklist popup appears automatically on the Admin Home page. The checklist guides you through the eight steps required to configure your district before opening enrollment.
The eight setup steps are:
| # | Step |
|---|---|
| 1 | District |
| 2 | School |
| 3 | Geo Boundaries |
| 4 | Privacy Settings |
| 5 | Communications |
| 6 | Users |
| 7 | Documents |
| 8 | Forms |
Each step has a Go to step button that takes you directly to the relevant configuration page, and a Mark as Done button to record your progress. Progress is saved per admin and persists across sessions.
The popup continues to appear on the Home page at every sign-in until all eight steps are marked complete. Once all steps are dismissed, the auto-popup stops. You can return to the checklist at any time by clicking Setup Checklist in the user account menu (top-right avatar).
Profile and Account Management ↑
Opening Your Profile
Click your avatar in the top-right of the header to open the User account menu, then select My Profile. The profile page header reads My Profile with the subtitle "Manage your account information and preferences."
Your role (for example, admin or enrollment specialist) appears as a small chip beneath your name and email — a quick way to confirm what you can and cannot do in the portal.

Editing Your Profile
- Click Edit at the top of the page.
- Update the editable fields:
- First Name
- Last Name
- Profile photo — see Managing Your Avatar below
- Click Save to apply your changes, or Cancel to discard them
Managing Your Avatar
While in Edit mode, click Change profile photo beside the avatar circle to open a file picker. Supported formats include JPEG, PNG, and WebP. Uploaded images are automatically optimized and resized.
If you don't upload a photo, the avatar shows your initials. Tip: on a mobile device the file picker offers direct camera capture, so you can take a portrait without leaving the page.
Changing Your Password
- From My Profile, click Change Password in the Account Security section.
- In the Change Password dialog, enter your Current Password.
- Enter a new password in New Password. Your new password must be at least 8 characters long and include a mix of uppercase and lowercase letters, numbers, and symbols.
- Re-enter the same value in Confirm New Password.
- Click Save to apply, or Cancel to discard.
The Password section also shows when your password was last updated (or "Last updated never" if you've never changed it).
Tips for Efficiency ↑
- Use SAML SSO when available — if your district has SAML configured, signing in from your SIS skips the password step entirely.
- Toggle the sidebar with Cmd+B (Mac) or Ctrl+B (Windows) — collapse it to icon-only mode to gain horizontal room on smaller screens; the shortcut works from anywhere in the portal.
- Set the theme to follow your system — leave the theme toggle on its default and the portal switches between light and dark with your operating system's setting.
- Verify your role chip after sign-in — the chip on your profile tells you at a glance which sidebar items and actions you'll see.
- Complete the Setup Checklist on first sign-in — new district admins should work through all eight checklist steps before opening enrollment windows to ensure the district is fully configured.
- Choose a strong, unique password and avoid reusing passwords across other accounts.